





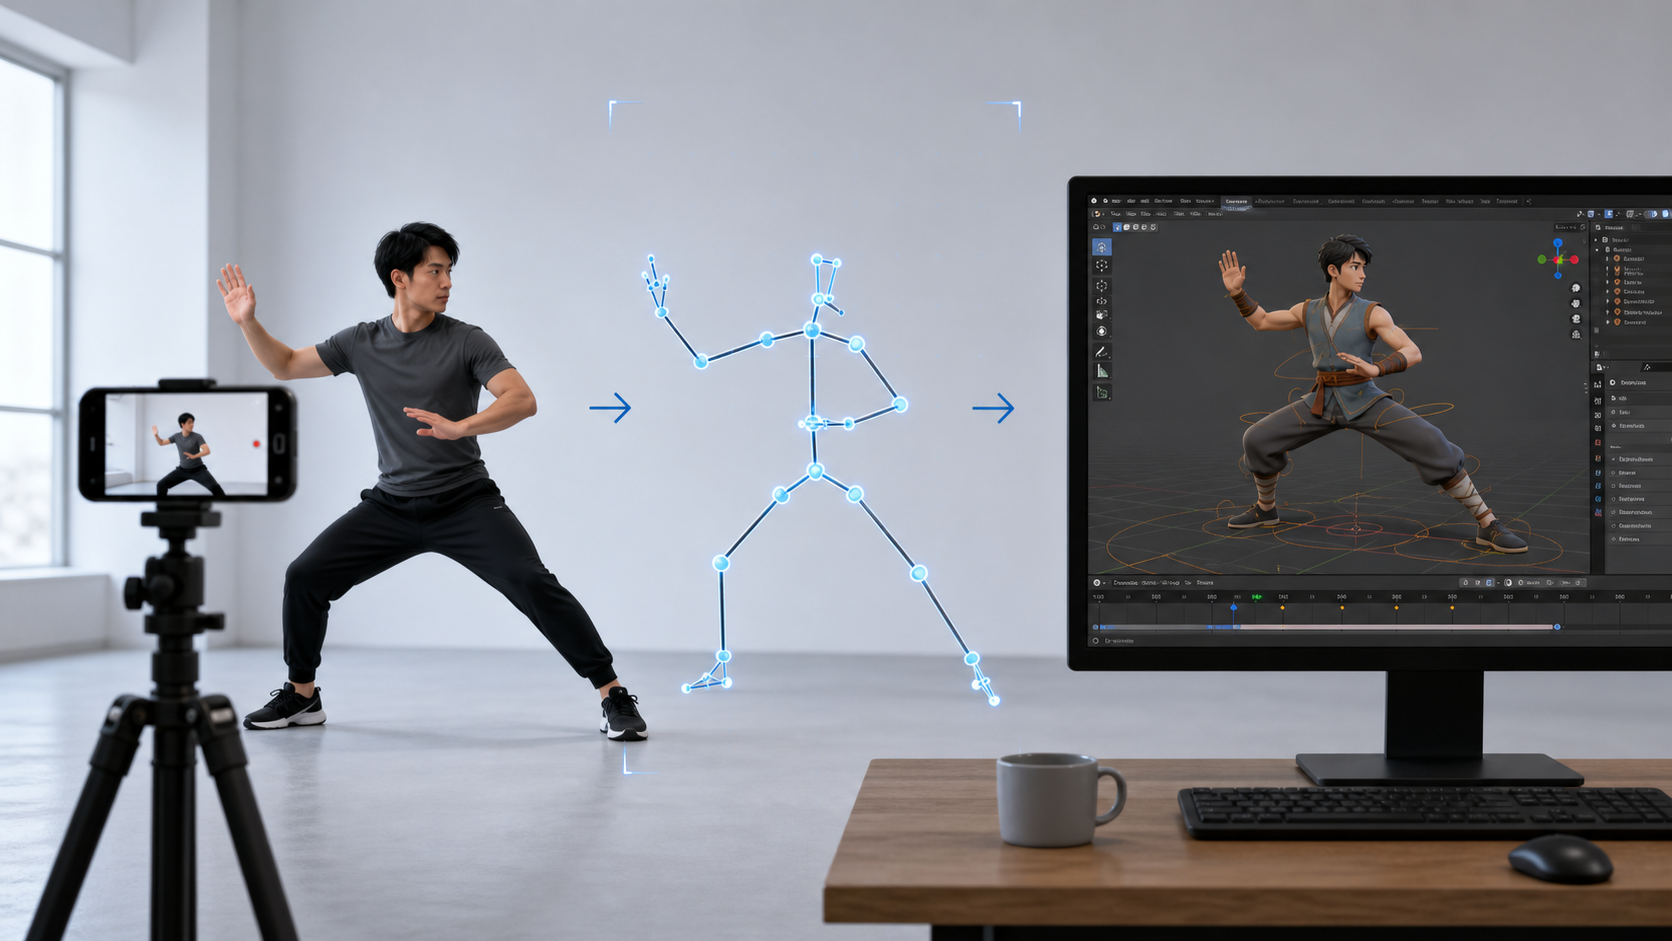
How do you make 3D animation from video?
Record a clear performance, upload it to an AI motion-capture tool such as QuickMagic, generate and inspect the movement, then export the motion in a format your 3D software supports. Import the animated skeleton, retarget it to a rigged character, correct contacts and timing, and render the finished scene.
A normal camera can provide the input. You do not need to wear a motion-capture suit, but you do need visible movement and a compatible character rig. Think of the generated motion as the starting performance for your animation: the quality of the source, the retargeting setup, and the final polish all affect the result.
What is video-to-3D animation?
In this guide, video-to-3D animation means markerless motion capture: estimating a performer's movement from ordinary footage and representing it as motion on a 3D skeleton. QuickMagic supports body capture plus hand and facial options in compatible workflows. Its output can become the animation source for a character in another application.
A motion-capture file is different from a finished video. It contains movement that you can edit, reuse, slow down, blend, or transfer to a different rig. It does not automatically reconstruct the performer's clothing, generate the whole environment, or deliver a camera-ready character model.
| Workflow | What it produces | Choose it when |
|---|---|---|
| Video motion capture | Animation data for a skeleton | You want to reuse a real performance on a 3D character. |
| Video stylization | A new rendered video | You want the footage to look animated without editing a character rig. |
| 3D reconstruction | Geometry or a scene representation | You need the object's shape or environment, rather than just its motion. |
How the movement becomes animation
A useful way to understand the process is to separate observation from interpretation. The system observes body positions in the image and estimates how joints move in three dimensions over time. Depth, hidden limbs, and contact points must be inferred, which is why a clear side view or a visible foot can make a noticeable difference.
After solving, the motion lives on a source skeleton. Retargeting transfers that motion to your character; baking stores the transferred result as animation keys. Those two steps make the performance usable in an ordinary animation pipeline.
Product capabilities: QuickMagic video-to-3D-animation overview. The explanation above describes the workflow, not unpublished model architecture.
Watch video become 3D character motion
The browser could not play this file. Open the official video or view it on QuickMagic.
What to look for: compare the recorded movement with the generated character motion. For your own tests, judge recognizable poses, stable foot contact, and continuity through turns. A showcase explains the idea; your production character still needs its own import and retargeting check.
What you need before you start
Prepare one short video, a QuickMagic account, and a destination for the animation. You can inspect a first result in the browser, but applying it to your own character requires a rigged model and a compatible 3D application.
- Source footage: QuickMagic's video tool lists MP4, MOV, AVI, and WebM as inputs.
- A character with a rig: a mesh alone cannot receive skeletal motion. It needs bones and a suitable deformation setup.
- A destination: Blender, Unreal Engine, Unity, Maya, 3ds Max, MMD, or another supported pipeline.
- A small test: one wave, step, turn, or short dance phrase is easier to evaluate than a long sequence.
Before recording, decide what success looks like. A background crowd performance can tolerate different imperfections from a close-up handshake. If the shot depends on fingers, props, or faces, plan those details before spending time processing full takes.
Record footage that gives the AI useful information
Frame the person with enough space for the widest arm extension and the longest step. Keep the feet in shot for full-body work, use even light, and avoid abrupt cuts. QuickMagic's recording guidance also recommends a reasonably level camera and a performer large enough in the image to track.

For a practical first setup, use a stable camera, a clear background, and a single performer. A 1080p recording is a sensible starting point when available. Check a few fast frames for blur: increasing frame rate alone will not sharpen a frame if the exposure is too long.
Capture the details your shot needs. A wide full-body view can leave the fingers or face too small for detailed tracking. A closer upper-body take may help an expressive dialogue shot, while a walking animation needs a view of the legs and floor. Choose framing to suit the intended capture scope.
Leave a little stillness before and after the action. This gives you useful trim points and makes it easier to compare the first pose, last pose, and intended motion direction. Avoid zooming or reframing during the first pipeline test.
Recording guidance: QuickMagic's video selection guide. Current upload limits are covered separately below.
Step by step: make 3D animation from video with QuickMagic
- 01Upload a short take
- 02Configure tracking
- 03Preview the solve
- 04Refine the source
- 05Export and retarget
- 06Polish and render
1. Upload the original video
Open QuickMagic's video-to-3D-animation tool, sign in, and upload a short original-quality take. Select the subject and usable range where those controls are available. A source name such as turn_left_take02 is easier to track than a generic camera filename.
Review the uploaded footage before generation. If the performer leaves the frame, trim to the usable action or record another take. Starting with a compact test also makes it easier to compare capture settings without changing several things at once.
2. Configure the capture for your target
Choose full-body or upper-body tracking to match the footage. Add hand or facial capture only when those features are available and the target character can use the resulting channels. Select the camera mode, output frame rate, and reference pose required by your workflow.
Decide how the character will move through the scene. With in-place animation, a game controller or scene transform normally supplies travel. With root motion, the clip retains movement that can drive the character. Save that decision with the export so you do not mistake a stationary walk for a failed capture.
For more than one performer, verify the current subject allowance and keep each person identifiable through the shot. Long overlap can create ambiguities even when multi-person tracking is available.
3. Generate and inspect the 3D result
Start the motion-capture job and preview the completed animation. Compare the source and output at the start, during the fastest action, at direction changes, and at the end. Processing time depends on the clip, features, plan, and queue; the job status is a better guide than a fixed promise.
Check the source skeleton before applying it to another character. Are left and right limbs consistent? Does a planted foot stay planted? Does the pelvis drift unexpectedly? Is a hidden hand jumping between poses? Write down the few frames that need attention.
4. Refine source tracking before export
Where available, use QuickMagic's 2D Refinement tools to correct detected joint positions and contact mistakes, then regenerate and compare. The documentation describes adjustments for missed poses and incorrect foot contact. Review the regenerated result rather than assuming a correction solved every surrounding frame.
For example, if a straight leg is interpreted as bent, correct the tracked pose. If a foot is labelled as airborne while clearly on the floor, review the contact setting. Source corrections are valuable because every character retargeted from that clip benefits from them.
Feature reference: QuickMagic editing and 2D Refinement. Access depends on the current workflow and plan.
5. Export and retarget to your character
Choose the format for the receiving application using the table below. Import the result and inspect the source animation at its intended frame rate. Next, map that source skeleton to the character's rig and align their reference poses, commonly an A-pose or T-pose.
Check scale, forward direction, hips, spine, hands, feet, and left/right assignments. Bake the transferred animation when the retargeting method requires it. Keep the unmodified source and the first retarget as separate versions so later cleanup remains easy to revise.
6. Finish the animation and render
Review contacts and silhouette on the final character. Different limb lengths can turn an acceptable source motion into a sliding foot or a hand passing through the torso. Adjust the root path, foot plants, hand placement, and selected curves in your animation software.
Add the parts that motion capture does not supply for your shot: props, camera, environment, materials, lighting, sound, and any missing facial or secondary animation. Render a low-cost preview first. Once timing and contacts work in the actual camera, render the final output.
Which export format should you choose?
Start with FBX for a general character workflow. Choose BVH for compatible skeleton-only pipelines, VMD for MMD, and BIP for 3ds Max Biped. A software preset describes a particular skeleton or workflow; it does not make every custom rig automatically compatible.
| Format | Typical destination | What to check |
|---|---|---|
| FBX | Blender, Unreal Engine, Unity, Maya, MotionBuilder | Skeleton hierarchy, reference pose, animation keys, and target preset. |
| BVH | Blender, mocap tools, motion-analysis workflows | Hierarchy, scale, axes, timing, and the receiving retargeter. BVH does not carry a character mesh. |
| VMD | MikuMikuDance | Model bone names, IK behavior, and supported motion or morph channels. |
| BIP | 3ds Max Biped | A Biped target and its proportions. BIP is not a general-purpose Maya or MotionBuilder interchange format. |
When choosing between a generic FBX and a named preset, start with the preset expected by your retargeting tool. If that tool expects Mixamo naming, a compatible Mixamo export can reduce mapping work. If the destination uses a custom skeleton, plan an explicit retargeting step.
Save the original footage, exported motion, frame-rate settings, and character mapping together. A reusable clip is much more useful when someone can identify which source and export settings produced it.
Import the motion into your 3D software
Every route has the same checkpoint: verify the imported source animation before diagnosing the target character. If the source is already wrong, changing the target rig can hide the cause and create more work.
Blender: import the armature, then retarget
Import the FBX through File → Import. For BVH, use the Motion Capture importer available for your Blender version. Confirm that the source armature animates, and match the scene timing to the exported motion. Transfer the action to your character using a compatible retargeting add-on or constraints, then bake when needed.
Do not assume that an imported skeleton automatically drives a Rigify control rig. Check the mapping and the destination bones or controls. Finish with a contact pass and organize approved actions for reuse.
Unreal Engine 5: use a compatible skeleton or IK Retargeter
Import the FBX into the Content Browser. Animation-only imports need an existing compatible skeleton; a new source character may need its Skeletal Mesh as well. For a different target skeleton, configure source and target IK Rigs, map the relevant chains, align the retarget poses, and export a target Animation Sequence.
Test root travel and foot contact on the actual character. A version-labelled Unreal preset is a useful starting point, but it still needs validation against your project. Epic's IK Rig retargeting documentation describes the source-to-target process.
Unity: validate the Humanoid Avatar
Import the FBX and, for a suitable humanoid, set the Rig animation type to Humanoid. Create or assign the Avatar, inspect its bone mapping, and verify the pose. Configure the animation clip and use it in an Animator Controller on a compatible character.
Automation still needs inspection: missing bones, unusual proportions, or incorrect mapping can prevent a usable Avatar. Non-humanoid characters need an appropriate Generic setup. See Unity's humanoid import guide.
Maya and MotionBuilder: characterize and bake
Use FBX as the interchange route. In Maya, define the source and target characters in HumanIK, choose the animation source, review the transfer, and bake the result to the appropriate rig or skeleton. A valid definition and a suitable control rig matter more than matching file extensions.
MotionBuilder likewise uses character and retargeting workflows for animation transfer. Reserve BIP for the Biped route in 3ds Max. Autodesk's HumanIK control-rig documentation explains the target-rig requirement.
3ds Max: distinguish Biped from other rigs
For a Biped character, load a compatible BIP motion through the Biped controls, with Figure mode off. Check the starting position and proportions after loading. For CAT or a custom rig, use an appropriate FBX/import-and-retarget workflow instead. Autodesk documents loading BIP animation onto a Biped.
MikuMikuDance: load VMD onto a compatible model
Export VMD when available, open MMD, load your character, then load the motion onto that model. Inspect feet, knees, wrists, and any morph channels. The model's bone and IK setup must match the assumptions of the motion; loading the file alone does not guarantee clean contacts.
Other destinations
For iClone, Character Creator, Roblox, or another named target, use the corresponding supported preset and check its import instructions. For robotics, treat captured motion as a reference that still needs joint mapping, constraints, and simulation validation. Character animation and robot control are different downstream tasks.
See a complete creator workflow
QuickMagic links to Defonten's tutorial, Turn any Video into Game Ready Animations with Quickmagic AI and Unreal Engine 5.7. The creator describes the route from recorded footage through QuickMagic FBX export to Unreal character retargeting.


