





How to Reduce Keyframes in Your AI Motion Capture with Auto Frame Reduction
Learn how QuickMagic intelligently strips redundant transition frames from your AI Motion Capture output — so animation files stay light, preview stays fast, and editing stays effortless.
When you finish a motion capture in QuickMagic, the engine outputs a standard full-frame animation file by default. Full-frame data preserves every detail of the performance — but it also carries a heavy load of redundant transition keyframes. The result: bloated file sizes, sluggish loading and preview, and a timeline so dense that manual editing becomes painful.
That is the problem our Auto Frame Reduction feature solves. It is an optional mode that runs on top of your original full-frame capture, using an intelligent algorithm to identify and strip redundant transition keyframes — slimming the file down.
Why full-frame capture produces heavy files
AI Motion Capture works by estimating body pose for every single frame of your source video. That means a 10-second clip at 30 fps ships with 300 keyframes per bone — every single one recorded, whether it represents a meaningful pose change or just a micro-transition the eye can't perceive.
For production, most of those frames are noise. They inflate file size, slow down real-time previews in game engines, and make it nearly impossible to fine-tune a specific beat in the Graph Editor. You end up fighting the data instead of directing the performance.
Auto Frame Reduction applies the same principle a professional animator follows by hand — keep the keys that define the pose, drop the ones that merely connect them — but does it algorithmically across your entire take in seconds.
Supported export formats
Auto Frame Reduction currently works with the following QuickMagic export formats:
In this tutorial we use Mixamo format as the example, but the workflow is identical for every format listed above.
How to enable Auto Frame Reduction
The feature is a single toggle in your capture workflow. Here is the step-by-step:
Upload your target video
Drop in the clip you want to capture — a dance, an idle loop, a gesture, or any performance recorded with a single camera.
Select your base model
Choose the rig and character format that matches your target pipeline.
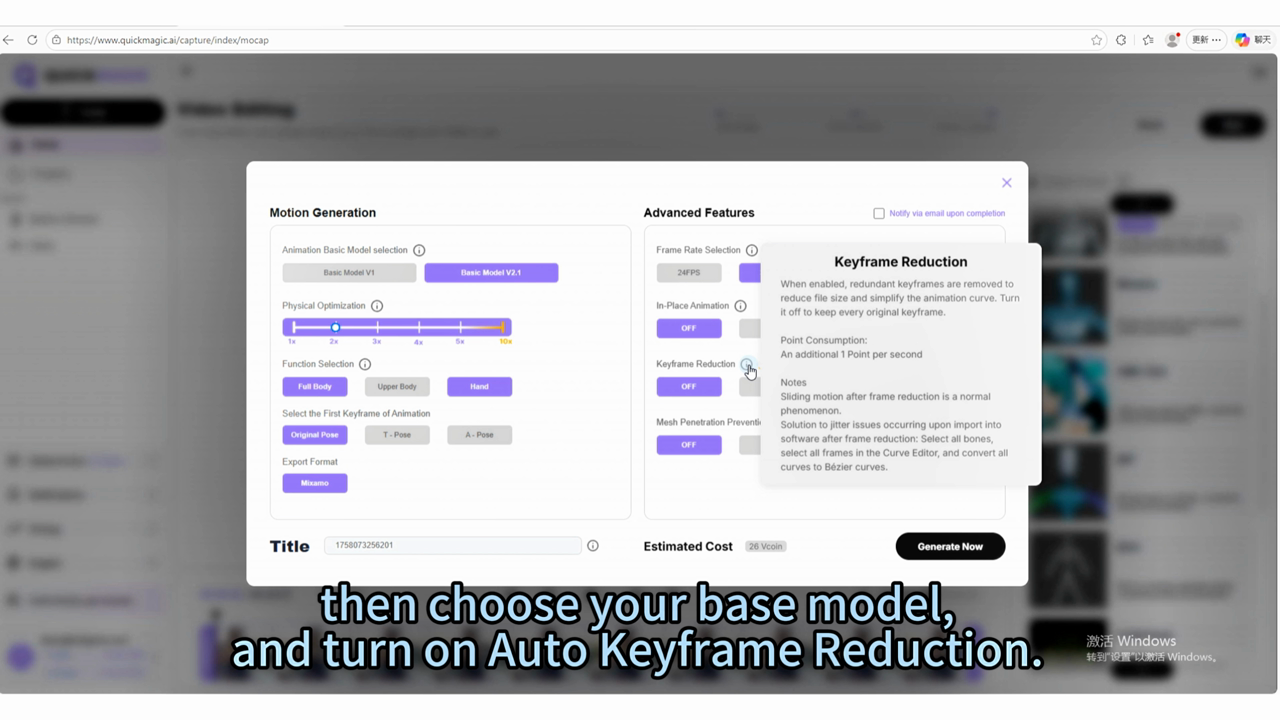
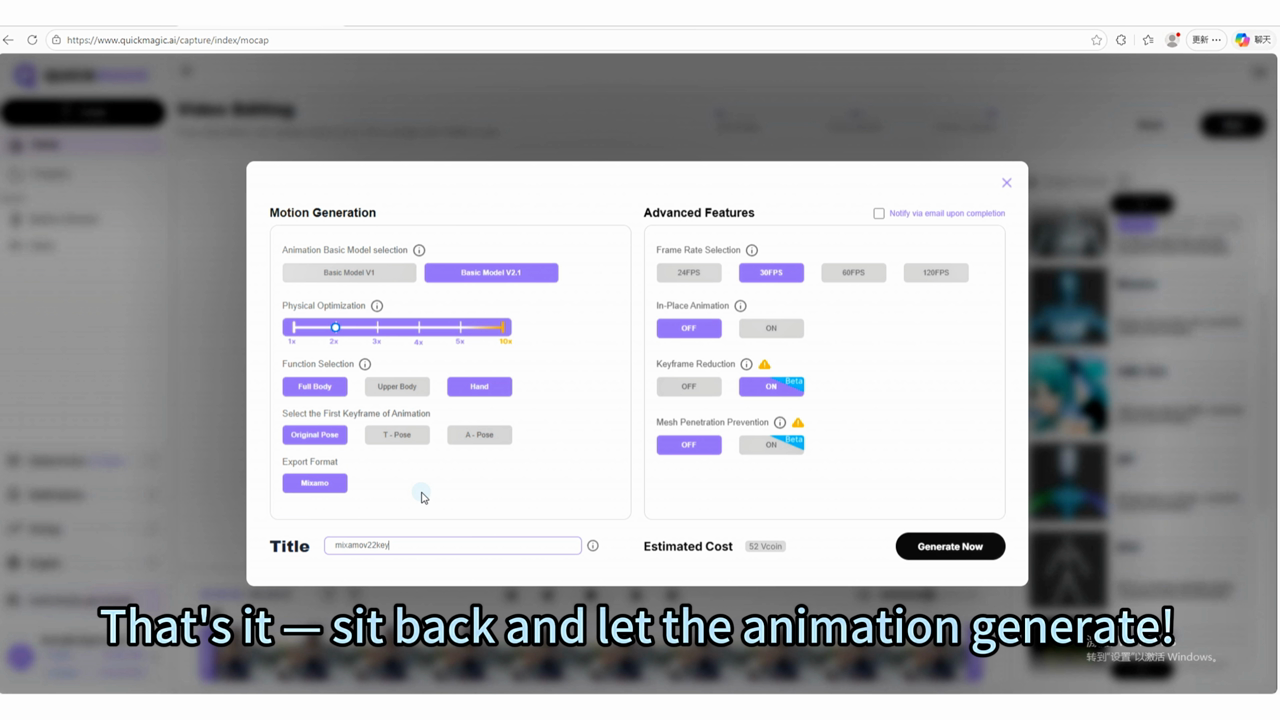
Toggle Auto Frame Reduction on
Before hitting process, flip the Auto Frame Reduction switch. The algorithm will run automatically once capture completes.
Wait for processing
QuickMagic runs the full pipeline — pose estimation, skeleton solve, retargeting, and frame reduction — and hands you a clean, lightweight file ready to use.
Before & after: what changes in the timeline
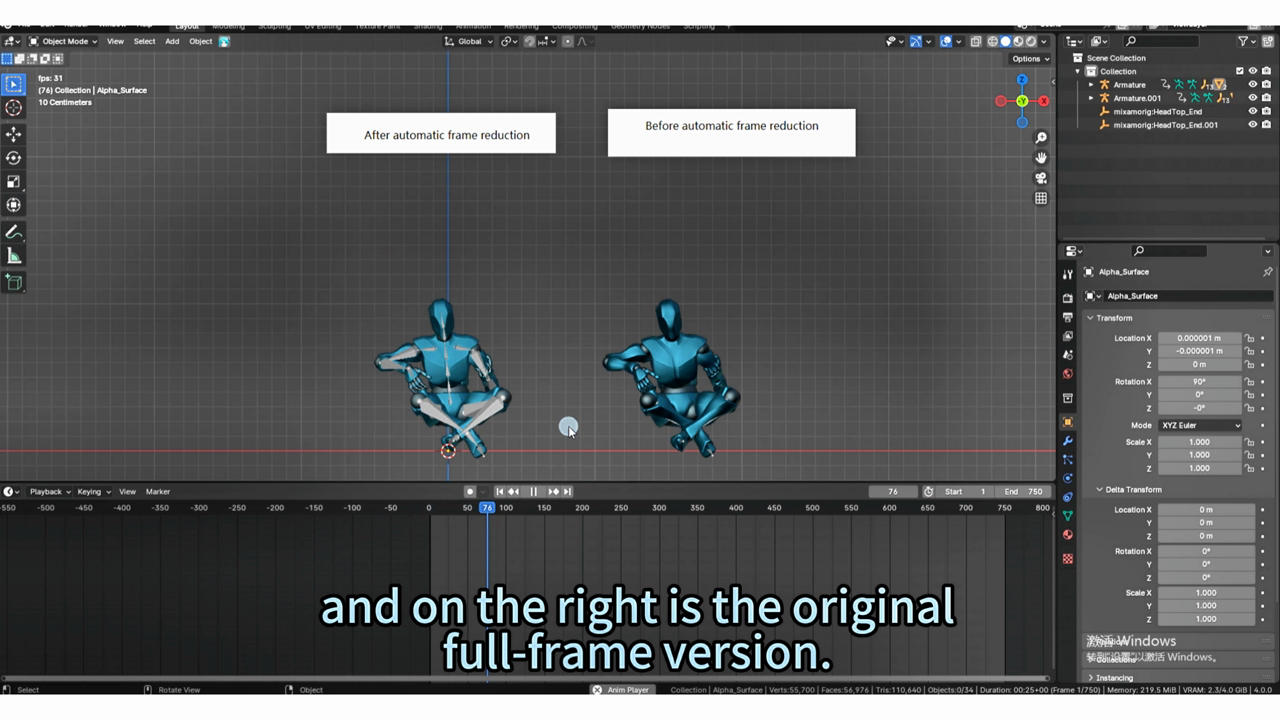
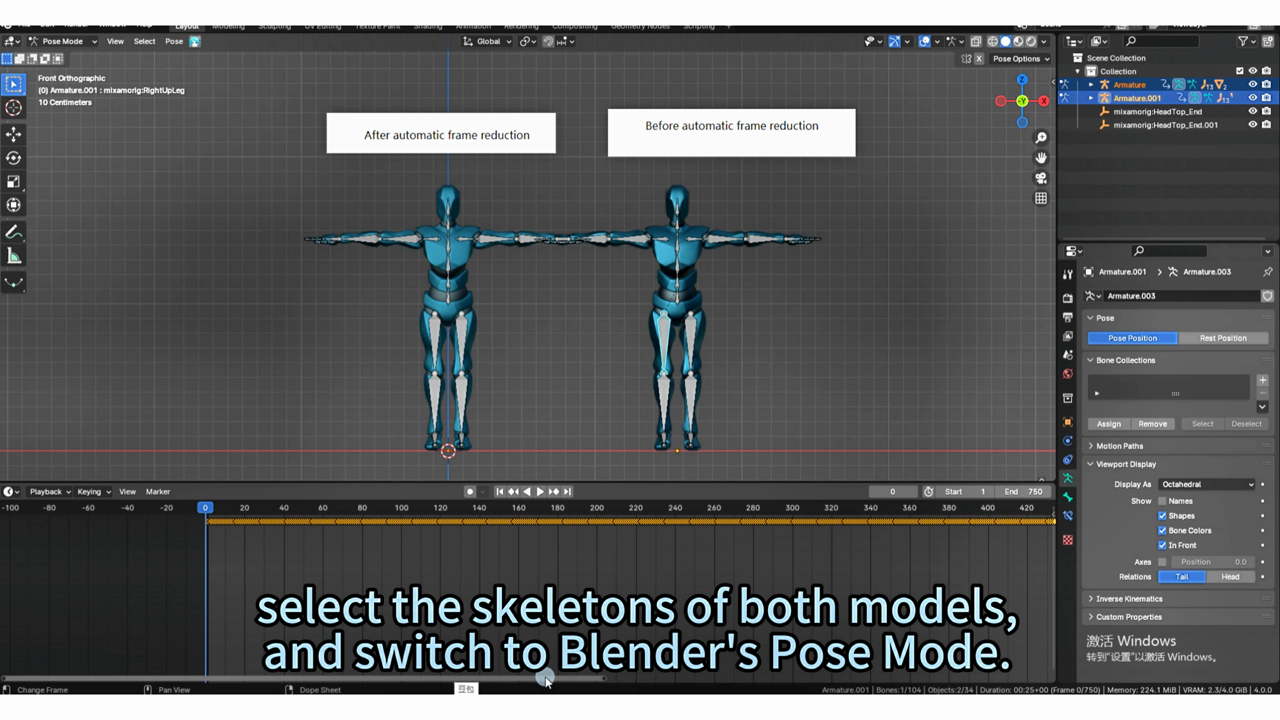
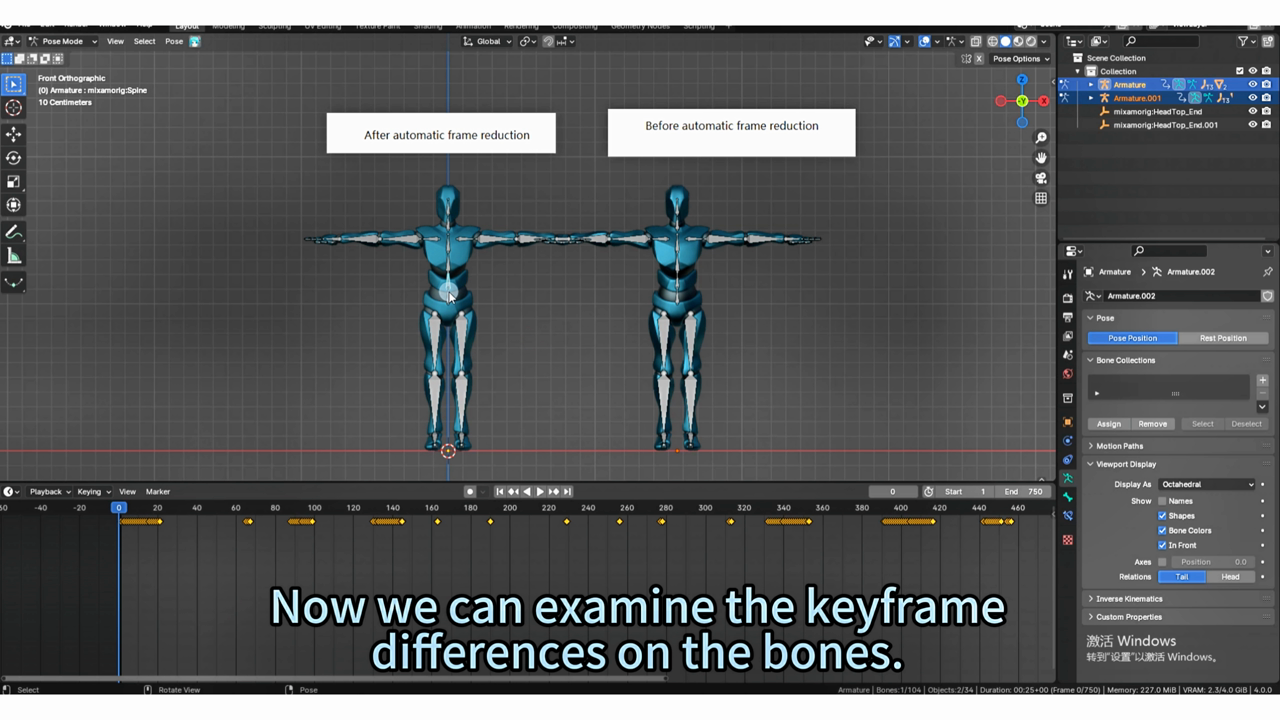
To see the difference, import both versions — with and without Auto Frame Reduction — into Blender (or any DCC tool of your choice). Select both armatures, switch to Pose Mode, and compare the keyframe density on corresponding bones.
Clean, sparse keyframes. Only the poses that define the motion are kept. The timeline is readable and the curve editor is workable.
Every frame is keyed. The timeline is a wall of diamonds, and manual editing is impractical.
The visual motion quality remains virtually identical at playback speed — the algorithm only removes frames whose interpolation can faithfully reconstruct the in-between poses.
Editing reduced animation in the Curve Editor
One of the biggest wins of frame reduction is editability. With a concise set of keyframes, you can open the Graph Editor (called the Curve Editor in Blender) and shape the motion the way you want.
Here is a practical workflow in Blender:
- Select all keyframes on the bone(s) you want to refine — press
Ain the Graph Editor to select everything in the current view. - Change the interpolation type to Bezier — press
Tand choose Bezier. This gives you smooth, controllable curves with tangent handles on every key. - Drag the tangent handles to adjust easing, timing, and pose weight. Because there are only a handful of keys per bone, each adjustment is deliberate and predictable.
- Add or remove keys as needed — the reduced set is a starting point, not a constraint. Insert a key wherever you need finer control.
The same approach works in other software: Unity's Animation window, Unreal's Sequencer, Maya's Graph Editor, and iClone's Curve Editor all let you refine reduced keyframe sets with Bezier-style interpolation.
The Auto Frame Reduction pipeline
| Stage | What happens | Auto Frame Reduction role |
|---|---|---|
| Upload | Upload a single-camera video of your performance | Not involved yet |
| Capture | AI Motion Capture estimates full-body pose per frame | Full-frame data is generated as the base |
| Retarget | Motion is mapped onto your chosen rig and format | Format-specific skeleton is prepared |
| Reduce | Algorithm identifies and removes redundant transition keyframes | Core step — intelligently prunes the keyframe set |
| Export | Lightweight animation file is delivered | Smaller file, cleaner timeline, ready to edit |
Known limitations & when to leave it off
We believe in being transparent about where the feature excels and where it does not. Auto Frame Reduction is built for steady, moderate-speed movements. For certain motion types, reducing keyframes can introduce artifacts because the interpolation between widely-spaced keys cannot fully reconstruct fast, extreme pose changes.
- Dance routines with rapid footwork and weight shifts
- Jumps and leaps where precise landing trajectories matter
- Large rotational twists with high per-frame pose delta
- Any high-speed, high-amplitude motion where every frame carries critical information
For these scenarios, the keyframe span after reduction becomes too wide for the interpolation engine to faithfully reconstruct fine landing trajectories and weight transitions. You may see foot sliding, pose floating, or other instability artifacts. In those cases, keep the original full-frame file — it carries the fidelity you need.
Our roadmap includes targeted improvements to address these cases, with a focus on foot locking and extreme-motion interpolation logic:
- Foot locking — preserving ground contact constraints through reduction to prevent foot sliding. This is our current priority.
- Extreme-motion interpolation logic — smarter keyframe retention for high-delta frames, so dance and jump sequences can also benefit from reduction.
- Broader scene coverage — expanding the range of motion types that benefit from reduction, continuously improving output quality across all scenarios.
Who benefits
- Game developers — lighter animation assets mean faster load times, smaller builds, and smoother in-engine previews.
- Animators — a clean keyframe set turns the Graph Editor from a chore into a creative tool. Shape timing and weight with intent.
- VTubers & creators — idle loops, gestures, and interaction clips process faster and take up less storage.
- Indie teams — ship the same performance at a fraction of the file size, with no extra pipeline cost.
Frequently asked questions
Does Auto Frame Reduction change the visual quality of my animation?
This is the first version of the Auto Frame Reduction feature, and we will continue to optimize the algorithm. For steady, moderate-speed movements, the results are solid. For high-speed extreme motions, visible artifacts may appear — in those cases, turn the feature off and use the original full-frame file.
Which formats support Auto Frame Reduction?
Currently supported: Girl, Boy, Mixamo, UE4, UE 5.5, UE 5.6–5.8, VMD-TDA, BIP, CC&iClone, Anim-Unity, Warudo, Roblox, and C4D. More formats will be added in future updates.
Is Auto Frame Reduction on by default?
No. It is an optional mode you toggle on before processing your video. If you do nothing, QuickMagic outputs the standard full-frame file as before.
Can I still edit the animation after reduction?
Absolutely — that is one of the primary benefits. Open the reduced file in Blender, Unity, Unreal, Maya, iClone, or MMD, select the keyframes in the curve editor, set interpolation to Bezier, and shape the motion exactly as you want. The sparse keyframe set makes every edit deliberate and predictable.
Should I use Auto Frame Reduction for dance or jump animations?
For high-speed, high-amplitude motions such as dance, jumps, and large rotational twists, we recommend turning Auto Frame Reduction off and using the original full-frame file. These motion types rely on every frame to preserve precise trajectories, and reduction may introduce foot sliding or pose floating. We are actively working on extreme-motion interpolation logic to expand the feature's coverage in future updates.
What is QuickMagic doing to improve this feature?
We are actively working on foot-locking algorithms, smarter extreme-motion interpolation logic, and broader scene coverage. The goal is to expand the range of motion types that benefit from reduction while maintaining full visual fidelity.


