Watch the Motion Editor workflow
The supplied video demonstrates ground-contact cleanup, hip stabilization and text-directed transition editing. Use the chapter buttons to inspect each example.
Read the visual walkthrough
0:14–0:28: a motion-analysis card identifies a ground-contact issue. The sequence proceeds to a completed fix and a gray-versus-purple comparison. The on-screen 74 and 98 scores are explicitly illustrative.
0:30–0:39: a second comparison presents a hip-stability edit. A visible result message refers to frames 0–109 and a frame-0 reference position.
0:49–0:55: the demo shows a request to make a smooth transition from frame 26 to frame 40, using frame 40 as the target pose.
This is a description of visible events, not a transcript of the audio. The edited demonstration does not show every setup click or the export dialog.
What does an AI motion editor actually change?
A motion editor changes the animation driving a 3D character. In this tutorial, the goal is to improve an existing performance: stabilize contact with the floor, reduce unwanted movement and reshape a short transition. This is different from changing the visual style of a rendered video.
QuickMagic’s official Motion Editor overview describes assisted diagnostics, language-guided editing, comparison and reversible changes. The tool is labeled Beta; availability and export limits depend on the current workflow and plan.
- 01 · INSPECTIdentify the unwanted movement.
- 02 · CORRECTApply a relevant fix or a scoped text edit.
- 03 · VERIFYCompare, refine and validate the result.
What the video establishes: the interface and examples shown below. It is a short product demonstration, not a controlled accuracy or speed test. Recommendations labeled “practice” extend the demonstrated workflow without claiming that every click appears in the recording.
1. Prepare the motion and identify the problem
Start with an editable animation in Motion Editor. The supplied clip begins with motion already loaded; it does not show the complete upload or capture process. An Import control is visible later in the chat panel, but supported input types should be checked in your current interface.
- Keep a copy of the original motion before experimenting.
- Play the entire animation once to understand the intended performance.
- Locate the interval where the problem appears. Record its frame numbers rather than relying on a vague instruction such as “fix the middle.”
- Decide what must remain: intentional steps, root travel, arm gestures, rhythm or a particular end pose.
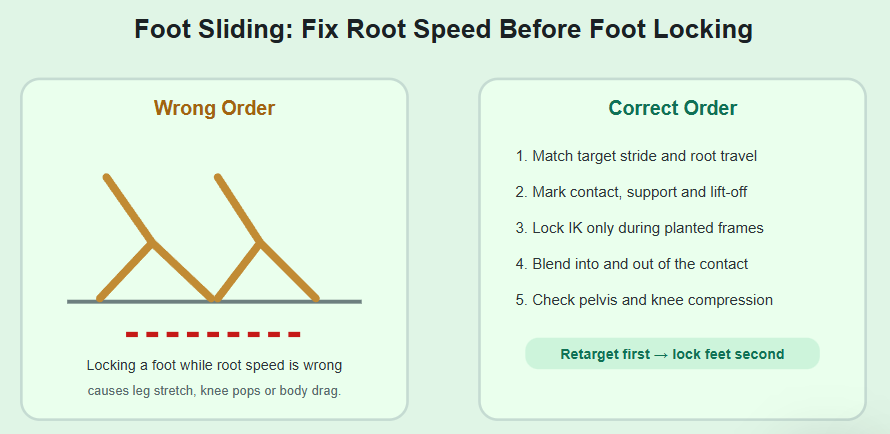
Practice: distinguish a planted foot drifting across the floor from an intentional pivot. Likewise, separate unwanted hip wobble from a dancer’s deliberate body sway. The same correction can help the first case and damage the second.
2. Review AI Motion Analysis and select the relevant fix
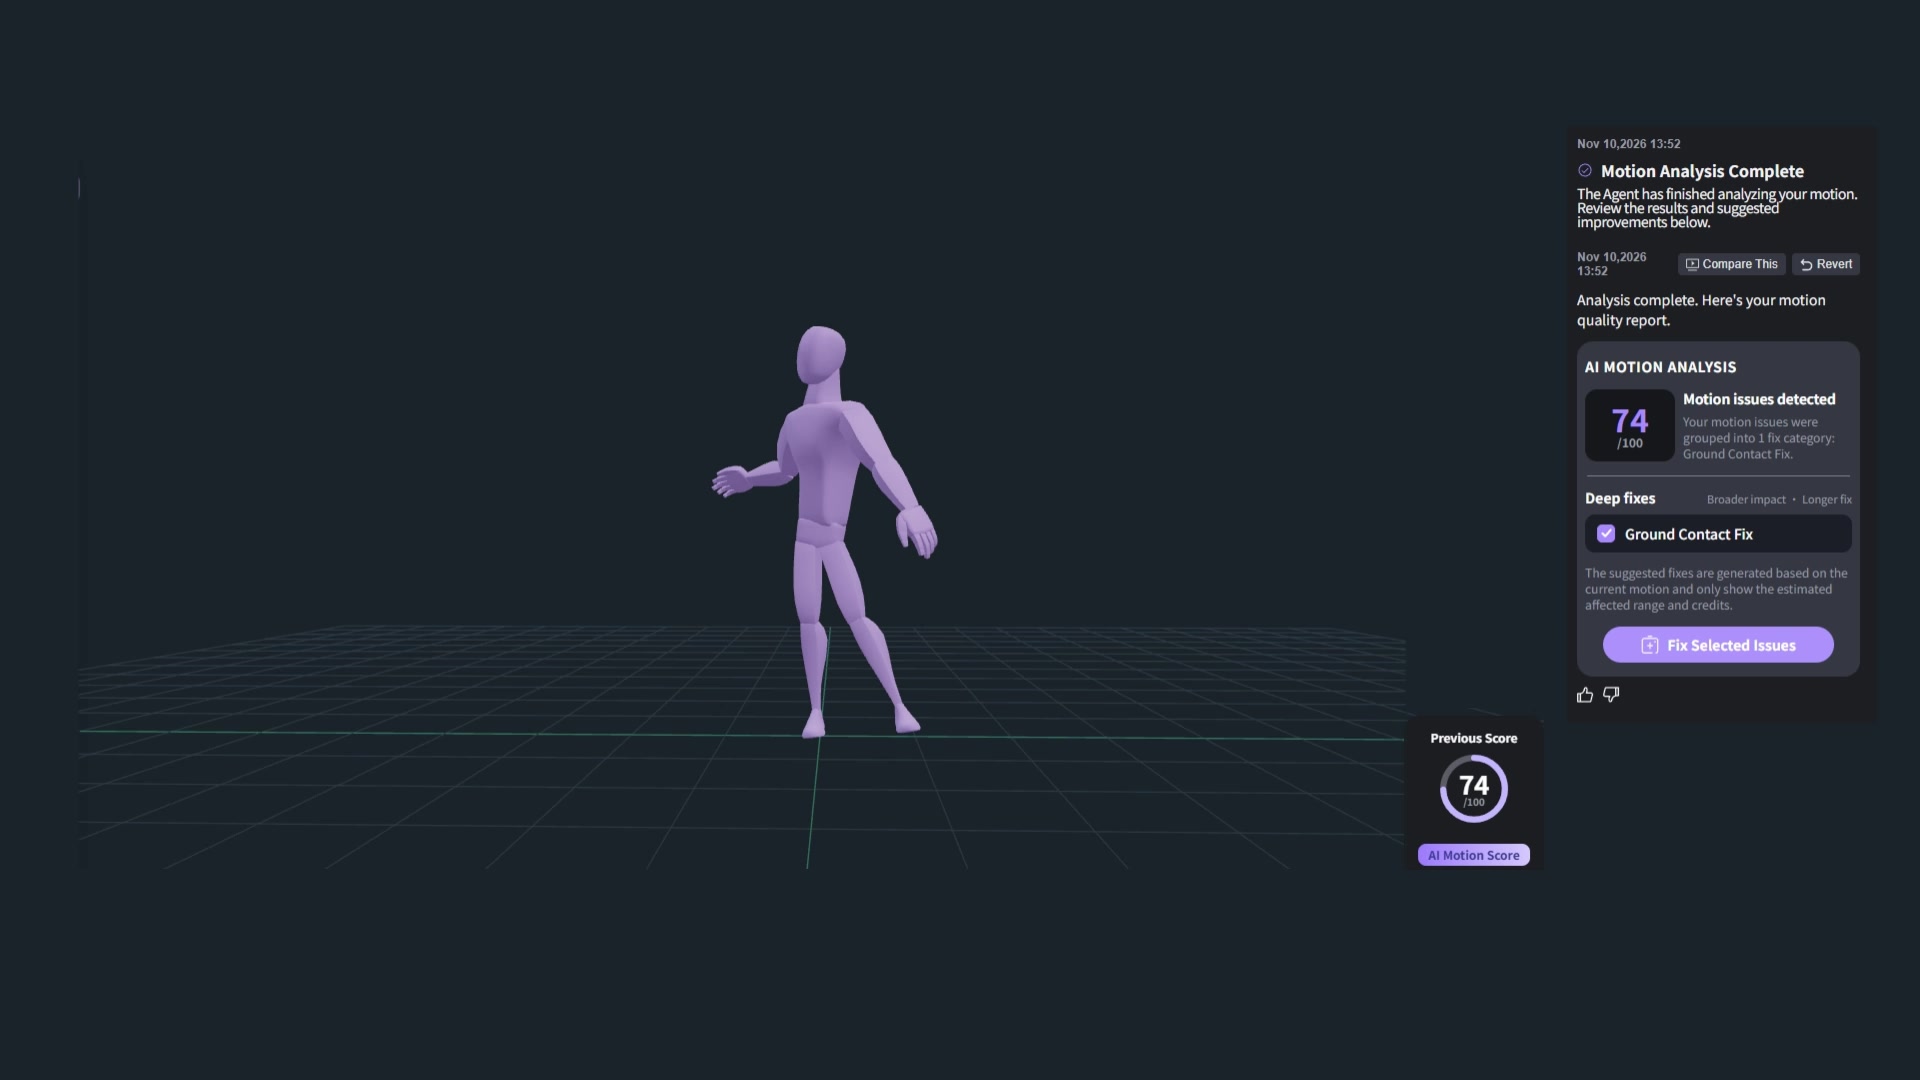
At , the right-hand panel shows Motion Analysis Complete and an AI MOTION ANALYSIS card. In this example, the detected issues are grouped into Ground Contact Fix.
- Read the analysis report for the selected motion.
- Check the listed issue category against what you see during playback.
- Select the relevant category. The demo shows Ground Contact Fix checked under Deep fixes.
- Review any affected-range and credit information provided in your session before proceeding.

Checkpoint: the selected fix should match a visible problem in the animation. Do not treat a score alone as a reason to remove intentional motion. The panel itself notes that deep fixes can have a broader impact.
3. Apply Fix Selected Issues and wait for the quality check
- 查看所选更正后,点击 Fix Selected Issues。
- 等待修复操作完成。
- 检查最终验证状态。视频中短暂显示 Deep Fixes Completed,而 Final Quality Check 仍处于待处理状态。
- 在发起另一次更改之前,先查看已完成的结果。

完成后的面板之后会提供 Fix Jitter & Joint Issues,用于处理其他稳定性问题。请将其视为一项独立的决定:先检查剩余的动作,然后仅在确实存在缺陷时再应用一次更正。在未查看中间结果的情况下叠加多次编辑,会让人更难判断是哪次更改改变了表演效果。
4. 对比原始动画和编辑后的动画
使用 Compare This 查看所选结果。演示中将灰色角色标记为 Original Anim,将紫色角色标记为 New Anim。其虚线圆圈用于突出显示脚部。

- 播放对比,并检查每个脚部着地的时间段。
- 检查脚部是否保持稳定,同时不会妨碍有意的迈步或转身。
- 向上观察:当修正地面接触后,膝盖方向、髋部高度和身体平衡都可能发生变化。
- 查看完整片段,检查是否出现新的不连续或丢失的手势。
- 如果结果不合适,请使用对比控件旁的 Revert。
5. 通过精确的文本请求优化髋部稳定性
下一个示例将 Selected Anim 与 New Anim 进行对比。在 处,可见消息描述了在 0–109 帧范围内修正髋部晃动,并将髋部保持在以第 0 帧为参考的位置。这是一个具体的稳定化示例,并非通用的清理设置。

实践:对于原地动作,识别不需要的位移,并请求进行受约束的修正。对于有位移的行走或跳跃,应保留有意的位移和垂直运动,而不是锁定髋部。
减少第 0–109 帧中不需要的髋部晃动。保留有意的身体摆动、手臂手势和时序。不要移除在地面上的有意移动。
建议的起始提示词,并非视频中的逐字指令。请将帧范围替换为你自己的范围。
- 在动作编辑文本框中输入一个范围明确的请求。
- 在确认操作之前,检查显示的任何解释或计划。
- 在请求的范围内,将生成的版本与源版本进行对比。
- 检查稳定化是否使躯干变得不自然僵硬,或改变了腿部伸展范围。
- 如果修正移除了你想保留的动作,请还原或缩小请求范围。
6. 平滑特定帧之间的过渡
最后一个编辑示例使用了明确的目标:从 第 26 帧到第 40 帧 的过渡,并以 第 40 帧 作为目标姿势。这些是动画帧编号,而非 63 秒演示视频中的时间戳。
制作从第 26 帧到第 40 帧的平滑过渡,使用第 40 帧作为目标姿势。
所提供视频中的屏幕指令。

- 拖动你的动画,找到姿势变化变得突兀的位置。
- 选择要调整的第一帧以及合适的后续目标姿势。
- 使用你实际的帧编号输入过渡请求。
- 播放编辑后的区间,然后包含其前后几帧一起查看。
- 检查两个边界处的连续性、手部和脚部路径,以及动作是否仍按时到达预期姿势。
实践:如果结果感觉过于柔和,请缩短区间或说明哪个重音必须保持清晰。平滑并非唯一目标:出拳、落地或节拍驱动的手势可能需要有意的速度变化。
7. 批准编辑、导出并在你的角色上验证
视频显示了 Export 和 Click here to export,但并未打开导出对话框,也未演示下游导入。请使用你账户中实际提供的格式和预设,而不要假定包含某种特定格式。
- 保留动作通过你视觉审查的版本。
- 打开可用的导出控件,并确认动作、范围和输出设置。
- 使用不同的版本名称保存已接受的结果。
- 使用兼容的设置将其导入目标动画或游戏引擎项目。
- 在目标角色上检查缩放、帧率、骨骼映射、根运动和地面接触。
实践:在演示人偶上获得干净的预览,并不能证明在比例不同的生产绑定上接触正确。如果问题仅在传输后出现,请先检查重定向和场景设置,然后再更改源动画。
如何编写更好的动作编辑提示词
让编辑可测试。有用的请求会说明要更改什么、在哪里更改,以及要保留什么。
| 目标 | 建议的提示词模式 | 编辑后审查 |
|---|---|---|
| 脚部接触 | 脚部在接触期间保持稳定,并自然释放。 | |
| 髋部晃动 | 躯干更稳定,但不会使表演僵化。 | |
| 姿势过渡 | 两个边界处均无可见跳变。 | |
| 局部抖动 | 手势仍富有表现力,而非变得平淡。 |
这些是供调整和测试的建议请求,并非在所提供片段中验证的其他操作。请一次只做一项更改,以便每次对比都有意义。
AI 动作捕捉清理故障排除
| 你看到的现象 | 接下来检查什么 |
|---|---|
| 脚部看起来稳定,但身体感觉僵硬 | 检查修正是否移除了有意的髋部或根运动。还原并使用更窄的范围。 |
| 过渡在边界处出现跳变 | 检查编辑范围之外的帧。重新考虑区间和目标姿势,然后再次对比。 |
| 分数提高,但动画看起来更差 | 优先考虑实际表演和接触。分数不能替代视觉批准。 |
| 编辑后的动作失去力度 | 识别有意的重音。请求保留它们或缩小平滑范围。 |
| 重定向后结果发生变化 | 检查骨骼映射、比例、缩放、根运动和目标地面高度。 |
| 控件与截图不同 | 按操作本身进行匹配,而不是猜测隐藏菜单。界面和可用性可能因版本而异。 |
常见问题
什么是 QuickMagic Motion Editor?
QuickMagic Motion Editor 是一个 AI 辅助的 3D 动作编辑工作区。在此演示中,它会分析动作、提供地面接触修复、显示原始动画和编辑后的动画,并支持文本指示的更改。
如何在 QuickMagic 中修复脚部滑动?
查看动作分析,选择相关的地面接触修正,并在演示界面中应用 Fix Selected Issues。在接受编辑之前,对比脚部着地的时刻。检查有意的迈步和转身是否未被锁定。
我可以通过输入指令来编辑 3D 动画吗?
可以。视频展示了第 26 帧到第 40 帧之间由文本指示的过渡。对于你自己的编辑,请指定身体部位、帧范围、预期更改和要保留的动作,然后对比结果。
74 到 98 的分数是否证明了特定的精度提升?
没有。视频明确将这些分数标记为仅用于演示,并说明实际分数未必总会提高。它们不是测量得到的精度百分比,也不是对另一个片段的保证。
我应该锁定髋部来消除抖动吗?
不应自动这样做。将髋部保持在参考位置可能适合原地动作,但可能会移除有意的位移、跳跃或身体摆动。首先判断不需要的动作是局部晃动还是有意的运动。
如何平滑动画过渡?
确定起始帧和结束帧以及合适的目标姿势。请求在该范围内进行过渡,然后检查编辑的进入、中间和退出部分。在视频中,请求使用第 26–40 帧,并以第 40 帧作为目标姿势。
我可以撤销动作编辑吗?
演示在 Compare This 旁显示了 Revert。先对比相关结果,如果它未能保留预期表演,再使用 Revert。对于生产工作,请保留单独的原始动作文件。
我可以在 Blender 或 Unreal Engine 中使用编辑后的动作吗?
检查你当前账户中可用的导出格式和预设,然后选择目标支持的一种。所提供的视频显示了 Export 控件,但未显示导出设置对话框,也未显示完成的 Blender 或 Unreal 导入。传输后请验证骨骼、缩放、时序和接触。