





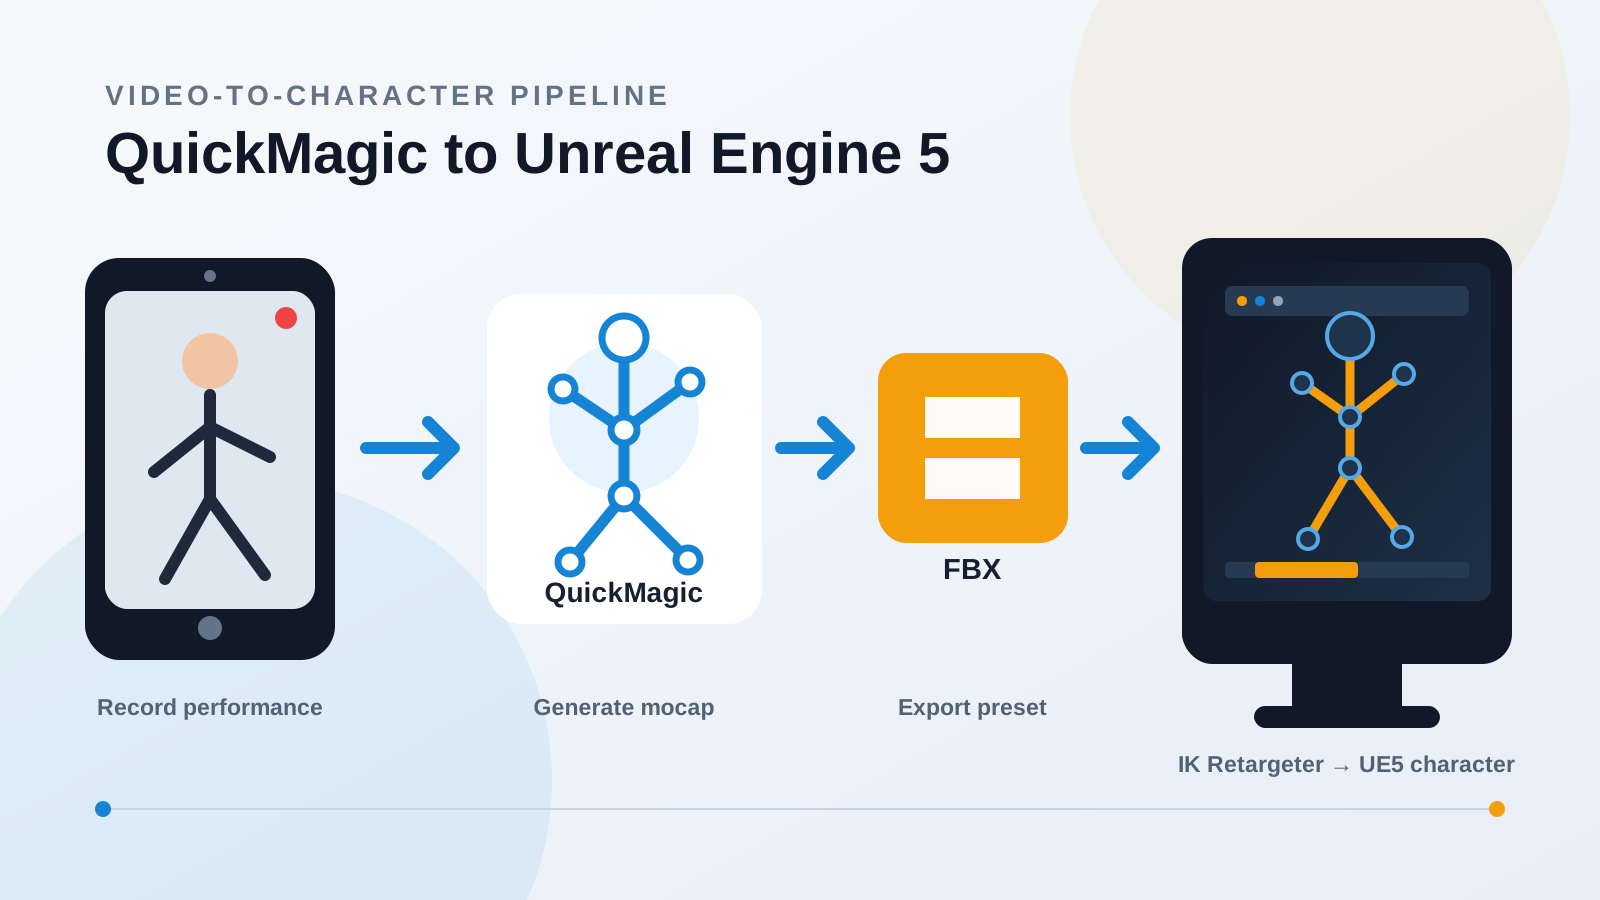
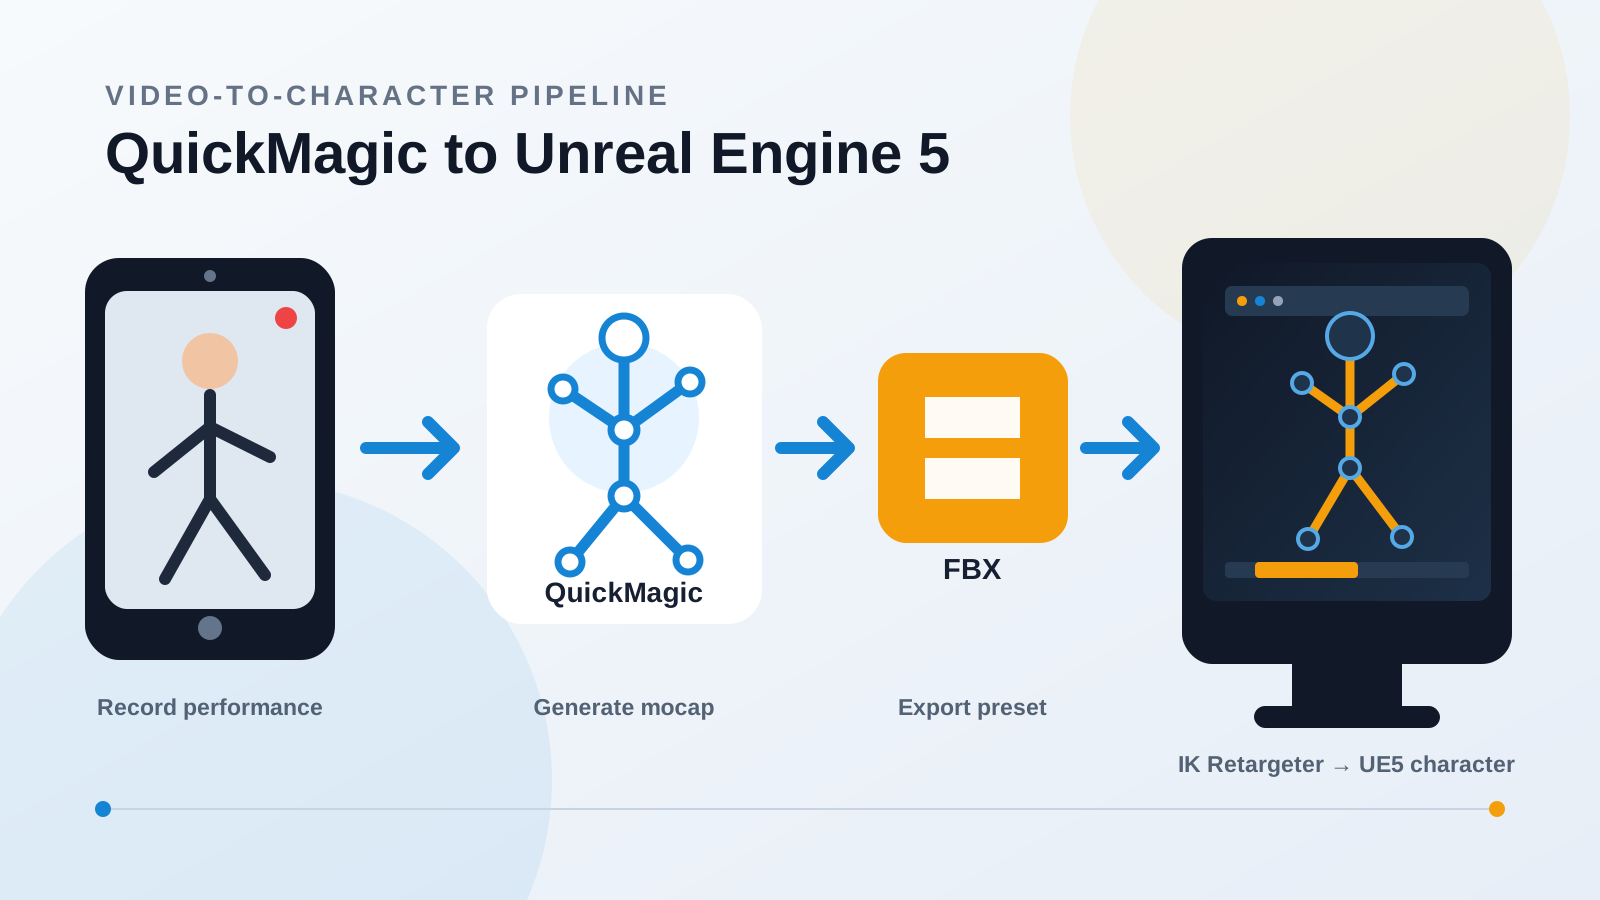
Quick answer: how do you move QuickMagic animation into Unreal Engine 5?
Record a clean full-body performance, upload it to QuickMagic, generate and inspect the motion, export the Unreal preset that matches your UE5 version—or a generic/Mixamo FBX—import the source skeleton and Animation Sequence into the Content Browser, build source and target IK Rigs, align their retarget poses, transfer the motion with an IK Retargeter, export the target Animation Sequence, then correct feet, pelvis, hands, scale, and root motion before using it in an Animation Blueprint, Montage, Control Rig, or Sequencer.
QuickMagic supplies skeletal motion. Unreal Engine supplies the character skeleton, retargeting, runtime animation logic, cinematic assembly, and final rendering.
The complete QuickMagic-to-UE5 pipeline
The essential technical handoff is not MP4-to-Unreal. QuickMagic first converts visible movement into keyframed skeletal data. UE5 then imports that data as a source animation and maps it to the production character.
What you need before starting
- A phone, webcam, DSLR, or existing video that you have permission to use.
- A QuickMagic account with the required capture and export options.
- An Unreal Engine 5 project.
- A target Skeletal Mesh: UE mannequin, MetaHuman body, Paragon character, or custom rigged character.
- IK Rig and IK Retargeter features available in the project.
- A clear decision between in-place and root-motion animation.
Start with a 5–10 second test clip. Validate the export, skeleton, retargeting pose, feet, and root behavior before processing a full performance.
Step 1: record footage QuickMagic can solve cleanly
| Capture choice | Recommended starting point | Why it matters in UE5 |
|---|---|---|
| Framing | Full body and both feet visible | Improves lower-body chains, floor contacts, and root interpretation. |
| Resolution | 1080p or higher | Preserves limb and hand detail. |
| Camera | Stable front or three-quarter angle | Reduces solve noise and depth ambiguity. |
| Lighting | Bright, even, limited motion blur | Produces clearer silhouettes and joint estimates. |
| Action length | 5–10 seconds for testing | Makes import and retarget debugging fast. |
| Movement | Avoid prolonged self-occlusion | Reduces crossed-limb and hidden-joint errors. |
Keep the performer separated from the background. Avoid cropped feet, other people crossing the shot, mirrors, heavy motion blur, and abrupt camera movement unless the selected QuickMagic workflow is intended for moving-camera footage.
Step 2: generate and validate the motion in QuickMagic
Upload the camera original
Use the original MP4, MOV, AVI, or WebM rather than a heavily recompressed social-media copy.
Select the capture scope
Choose full-body capture for general UE5 character work. Enable hands or facial options only when the target character and downstream mapping support those channels.
Choose pose and frame rate
Select the reference pose required by the target pipeline and match the intended Unreal project timing. QuickMagic exposes pose and frame-rate controls in supported workflows.
Choose in-place behavior
Use in-place for locomotion driven by Character Movement. Preserve travel when the captured performance should drive cinematic or gameplay displacement.
Inspect the solve
Check feet, hips, floor height, turns, hands, crossed limbs, and fast impacts. Use available refinement or anti-penetration controls before export.
Step 3: choose the right QuickMagic export for UE5
QuickMagic currently lists UE4, UE5.5, and UE5.6 presets, alongside generic FBX, Mixamo, and BVH options. Its published guidance says the UE5.5 format supports UE5.5 and earlier UE5 versions, while UE5.6 is intended for UE5.6 and later workflows. Confirm the current export label in your account because available presets can change by product version and plan.
Route A: matching Unreal preset
Use when the target version and skeleton workflow match the preset. This can reduce bone-remapping work and is the best first test for the supported Unreal target.
Route B: generic or Mixamo FBX
Use for flexible IK Rig retargeting. Import it as the source Skeletal Mesh and Animation Sequence, then map it to the UE mannequin, MetaHuman, Paragon, or a custom character.
| Target | Recommended first test | Fallback |
|---|---|---|
| Compatible UE5 skeleton/version | Matching QuickMagic Unreal preset | Generic FBX + IK Retargeter |
| MetaHuman body | Matching UE/MetaHuman workflow when available | FBX source + MetaHuman IK Rig |
| Custom character | Generic or Mixamo FBX | Intermediate DCC cleanup, then FBX |
| Older project | Preset documented for that UE version | Generic FBX with version-appropriate retargeting |
QuickMagic export compatibility: official product overview and format workflow guide.
Step 4: import the QuickMagic FBX into Unreal Engine 5
- Create a folder such as
Characters/Mocap/QuickMagic/Source. - Drag the FBX into the Content Browser or use Import.
- For a new source skeleton, enable Skeletal Mesh and Import Animations.
- If importing animation for an existing compatible skeleton, disable mesh import and select that Skeleton asset.
- Confirm the animation range and sample rate.
- Import, then open the resulting Animation Sequence.
- Enable bone display and inspect the root, pelvis, feet, hands, scale, facing direction, and timing.
Epic’s current FBX documentation states that the UE FBX animation pipeline uses FBX 2020.2. QuickMagic controls the generated file, so the practical check is whether the chosen preset imports successfully and produces the expected Skeleton and Animation Sequence.
Import reference: Epic Games — Importing Animations Using FBX.
Step 5: retarget QuickMagic motion with IK Rig and IK Retargeter
Create the source IK Rig
Right-click the imported source Skeletal Mesh and create an IK Rig. Set the retarget root—typically pelvis or hips—and define chains for spine, neck, head, arms, legs, hands, and optional fingers.
Create or reuse the target IK Rig
Use the target character’s existing IK Rig when suitable, or create one and define corresponding chains.
Create the IK Retargeter
In the Content Browser choose Animation → IK Rig → IK Retargeter, select the source IK Rig, then assign the target IK Rig.
Match the chains
Confirm that left/right arms, legs, spine, neck, head, hands, and fingers map to the intended target chains.
Align the retarget poses
If the source is T-pose and the target is A-pose—or vice versa—create a dedicated Retarget Pose and align shoulders, arms, hands, pelvis, knees, and feet.
Preview and export
Run the retargeter, inspect the motion, then select the source animation and export it as a new target Animation Sequence.
UE5 chain-based retargeting can transfer animation between skeletons with different bone counts, names, and orientations. Matching rest poses remains one of the most important quality controls.
Retargeting reference: Epic Games — IK Rig Retargeting.
QuickMagic to MetaHuman: the practical body-animation route
A MetaHuman workflow uses the same overall logic: QuickMagic provides body motion, the imported source becomes the retarget input, and the MetaHuman body becomes the target.
- Add the MetaHuman to the UE5 project.
- Import the QuickMagic FBX as a source animation.
- Create or select the source IK Rig.
- Use the appropriate MetaHuman body IK Rig as the target.
- Create an IK Retargeter and align the source/target poses carefully.
- Validate pelvis height, shoulder width, hands, feet, and character scale.
- Export the retargeted MetaHuman Animation Sequence.
- Handle face animation separately unless the chosen QuickMagic face workflow and MetaHuman mapping are explicitly compatible.
Body, hands, and face are different data problems. A successful body retarget does not automatically map facial curves or finger naming to a MetaHuman.
Step 6: choose and configure root motion correctly
In-place animation
Best for walk/run cycles and gameplay locomotion where Character Movement, Motion Matching, or Blueprint logic controls translation.
Root-motion animation
Best for attacks, vaults, takedowns, dance, and cinematic actions where captured displacement is part of the performance.
For a root-motion clip, open the target Animation Sequence and enable Enable Root Motion. Then choose how the Animation Blueprint extracts it, such as Root Motion from Montages Only for common gameplay setups. Verify that the actual root bone—not only the pelvis—contains meaningful displacement.
If a character runs away from its capsule and snaps back, or remains stationary when it should travel, check:
- QuickMagic in-place/export selection.
- Whether the FBX contains motion on the correct root.
- Retarget root and pelvis configuration.
- Animation Sequence root-motion settings.
- Animation Blueprint Root Motion Mode.
- Character Movement and movement mode.
Root-motion reference: Epic Games — Root Motion.
Step 7: clean and polish the retargeted UE5 animation
| Problem | Likely cause | Best first correction |
|---|---|---|
| Foot sliding | Scale, stride, contacts, pelvis, root, chain settings | Validate source; adjust retarget pose and leg chains; use IK/Control Rig for planted contacts. |
| Floating or sinking | Pelvis/root height or character proportions | Correct root/pelvis retarget operations and target pose. |
| Twisted arms or wrists | A/T-pose mismatch or bone-axis differences | Edit the Retarget Pose and chain rotation settings. |
| Wrong facing direction | Source skeleton orientation | Correct import/export orientation or source root alignment. |
| Hands miss props | Proportion changes and no target-space contact | Add Control Rig hand constraints or IK adjustments. |
| Jitter | Source occlusion, blur, or over-detailed keys | Refine the QuickMagic solve first; apply selective UE/DCC smoothing. |
Use Control Rig or Sequencer for shot-specific corrections. Keep the original imported source, the first retarget, and the polished version as separate assets so changes remain reversible.
Step 8: use the animation in gameplay or cinematics
For gameplay
- Place the clip in an Animation Blueprint state machine, Blend Space, Motion Matching database, or Animation Montage.
- Choose in-place or root motion based on movement ownership.
- Add notifies for footsteps, attacks, effects, and gameplay events.
- Test transitions, collision, network behavior, and performance.
For cinematics
- Add the target character to a Level Sequence.
- Assign the retargeted Animation Sequence.
- Use Control Rig layers for contacts, gaze, hands, and shot-specific edits.
- Add Cine Camera actors, lighting, environment, face animation, and audio.
- Preview the complete sequence, then render through Movie Render Queue.
Watch a QuickMagic-to-Unreal Engine workflow
This creator workflow demonstrates recording a performance, generating QuickMagic FBX motion, importing it into Unreal Engine, and retargeting it to game characters.
Additional UE5 and MetaHuman example
A second creator video shows a long smartphone-recorded performance being processed with QuickMagic and applied to a MetaHuman in Unreal Engine 5.
Frequently asked questions
Can QuickMagic export directly to Unreal Engine 5?
QuickMagic lists Unreal-specific presets including UE5.5 and UE5.6, as well as generic and Mixamo FBX alternatives. Select the preset that matches the target UE version and skeleton workflow.
Which QuickMagic export should I use for UE5?
Start with the matching Unreal preset when available. For custom characters or a flexible pipeline, import generic or Mixamo FBX as the source and use IK Rig plus IK Retargeter.
Can I use QuickMagic animation on a MetaHuman?
Yes. Import the source animation, retarget the body motion to the MetaHuman body skeleton, align the retarget pose, and validate pelvis, shoulders, hands, feet, scale, and root behavior.
Why is my retargeted character in a T-pose?
Check that the imported source Animation Sequence contains keys, both IK Rigs have valid retarget roots and chains, the IK Retargeter uses the correct source and target, and chain mappings are not empty.
Why do the feet slide after retargeting?
Common causes are weak source contacts, scale differences, mismatched leg proportions, incorrect retarget pose, pelvis/root settings, or using in-place motion where travel was expected.
Should I export in-place or with root motion?
Use in-place when gameplay movement drives the character. Keep root travel for attacks, vaults, dance, cinematics, and other performances where authored displacement matters.
Can QuickMagic capture body, fingers, and face for UE5?
QuickMagic publishes body, hand, and facial capture options. The target skeleton must still have compatible bones or facial curves, and each channel should be validated separately.
Can I edit the result without leaving Unreal Engine?
Yes. Use IK Retargeter settings for transfer quality and Control Rig, Sequencer, animation layers, or compatible UE animation tools for shot-specific polishing.
Validate one short UE5 animation first
Record a five-second action, generate it in QuickMagic, export the matching preset or FBX, retarget it to the actual production character, and test feet, pose, root motion, and runtime behavior before scaling the workflow.
Create UE5 animation with QuickMagic →

