Bone remapping is the critical step that makes AI mocap usable on any character rig. When you generate motion capture with QuickMagic, the animation data is bound to QuickMagic's default skeleton. To apply that motion to your own character — whether it's a game hero, a stylized cartoon figure, or a MetaHuman — you need to retarget the animation by remapping bones from the source skeleton to your target rig.
Blender, combined with the Auto Rig Pro add-on, provides one of the most efficient retargeting workflows available. This tutorial walks you through every step — from downloading QuickMagic animation data to executing the final bone remapping in Blender.
What Is Bone Remapping?
Bone remapping (also called retargeting) is the process of transferring animation data from one skeleton to another. Each bone in the source skeleton is mapped to a corresponding bone in the target skeleton, allowing the same animation to be applied to characters with different bone structures, proportions, or naming conventions.
This is essential because:
- QuickMagic mocap uses its own skeleton format
- Your character rig likely has a different bone hierarchy and naming
- Proportions differ between characters (a tall warrior vs. a short goblin)
- Without remapping, the animation simply won't transfer correctly
What You'll Need
- Blender 3.0 or later (free from blender.org)
- Auto Rig Pro add-on installed in Blender (available on Blender Market)
- A QuickMagic account with processed animation data
- Your target character model with a rigged armature in Blender

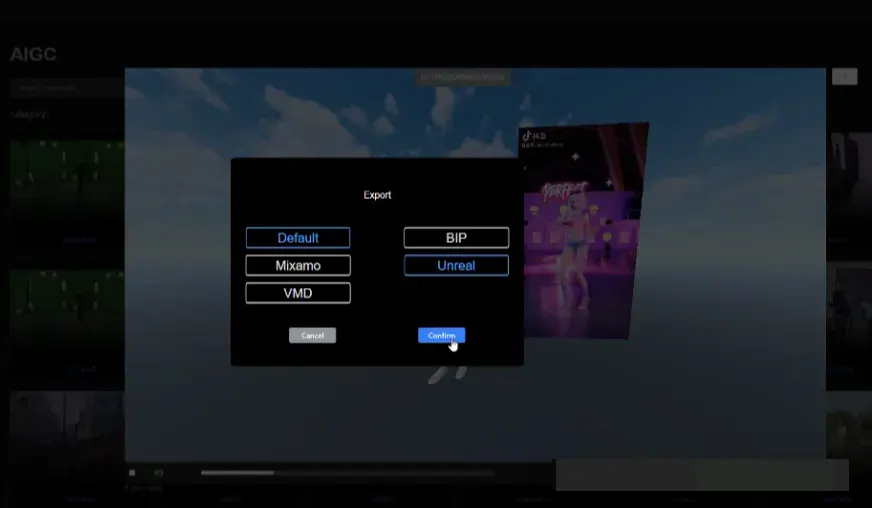
1 Download Animation Data from QuickMagic
Log in to your QuickMagic account and process a video into motion capture data. Once processing is complete, download the animation file:
- Recommended format: FBX (preserves bone hierarchy and animation curves)
- Alternative: BVH (simpler format, works but with less metadata)
- Frame rate: Match to your Blender project (typically 30fps or 60fps

2 Open Source and Target Files in Blender
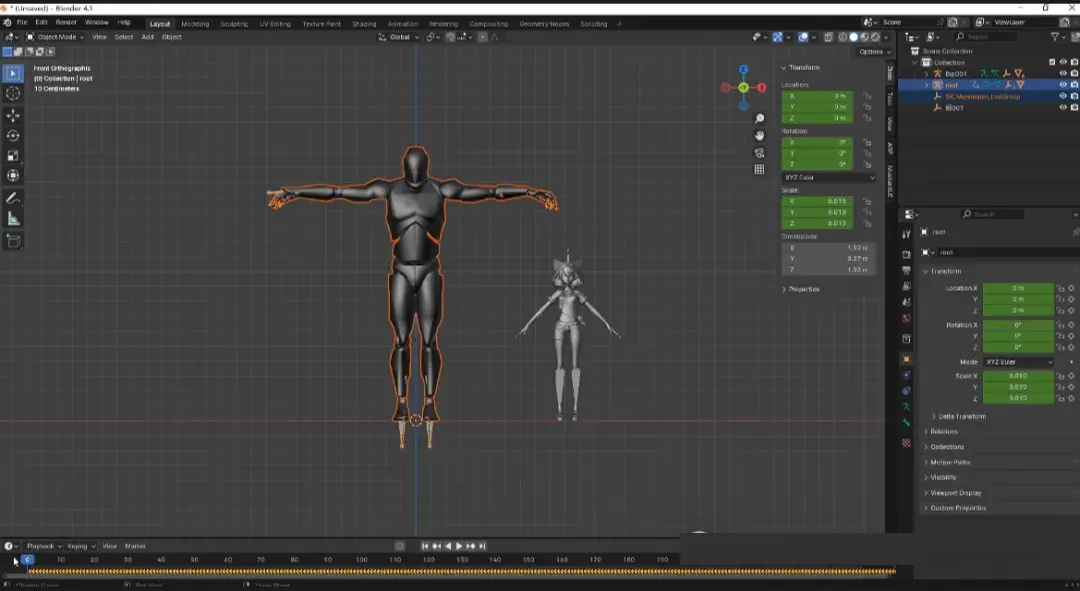
In Blender, open your target character model with its rigged armature. Then import the downloaded QuickMagic animation file:
- Go to File → Import → FBX (or BVH)
- Select your QuickMagic animation file
- Ensure Import Animations is checked in the import dialog
- Both the QuickMagic skeleton (source) and your character rig (target) should now be visible in the viewport
You should see two armatures in your scene: the QuickMagic source skeleton with animation data, and your target character rig waiting to receive the animation.
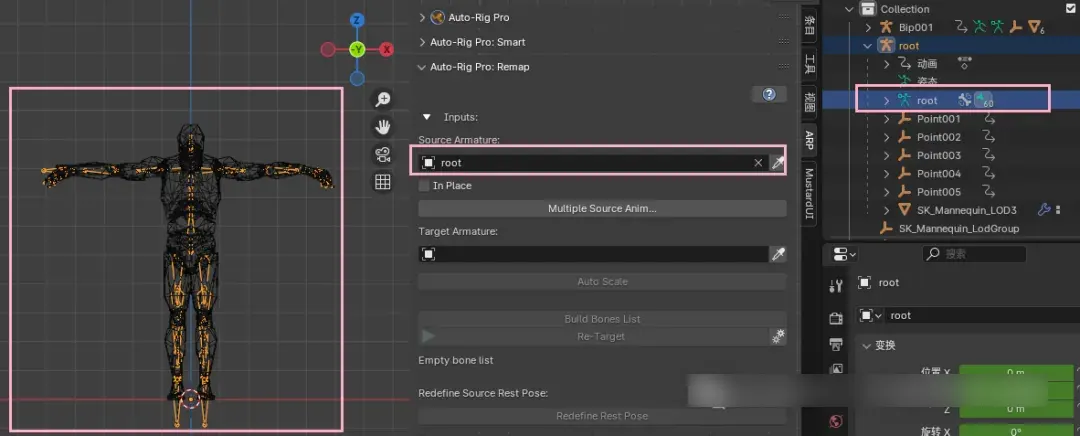
3 Open Auto Rig Pro: Remap & Select Source Armature
Open the Auto Rig Pro panel in Blender (usually found in the N-panel sidebar). Navigate to the Remap section.
- In the Remap panel, find the Source Armature field
- Click the picker (eyedropper icon) and select the QuickMagic skeleton in your viewport
- This tells Auto Rig Pro which armature contains the animation data you want to transfer
The source armature is the skeleton that came with your QuickMagic download — it has the animation keyframes attached.
4 Select Target Armature
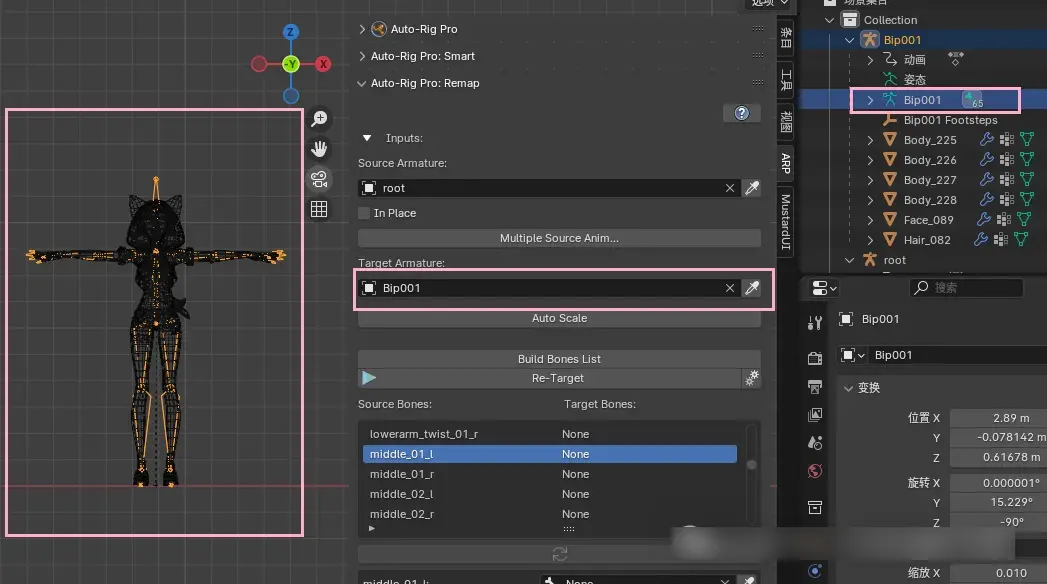
Next, designate the Target Armature — this is your character's rig that will receive the animation:
- Find the Target Armature field in the Remap panel
- Use the picker to select your character's armature in the viewport
- Verify both source and target armatures are correctly displayed in their respective fields
5 Apply Proportional Auto Scale
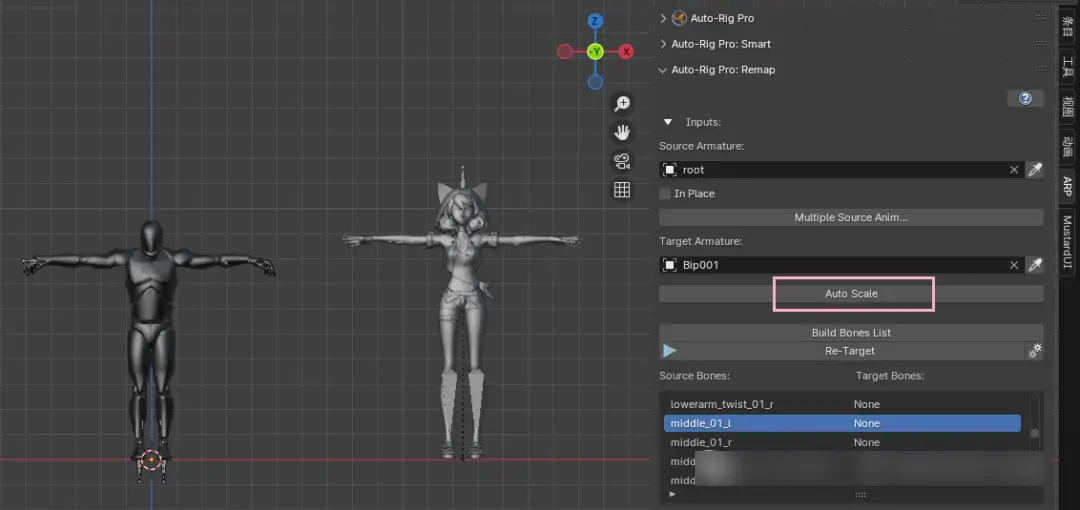
Enable Auto Scale for proportional matching. This is a critical step — it automatically adjusts the source animation to match the proportions of your target character.
Why Auto Scale Matters
- Without scaling, a 6-foot tall source character's walk cycle applied to a 3-foot goblin would look wrong
- Auto Scale normalizes limb lengths, spine proportions, and overall height
- It prevents stretched, compressed, or offset animations
- It's especially important when the source and target have significantly different proportions

6 Build & Verify the Bones List
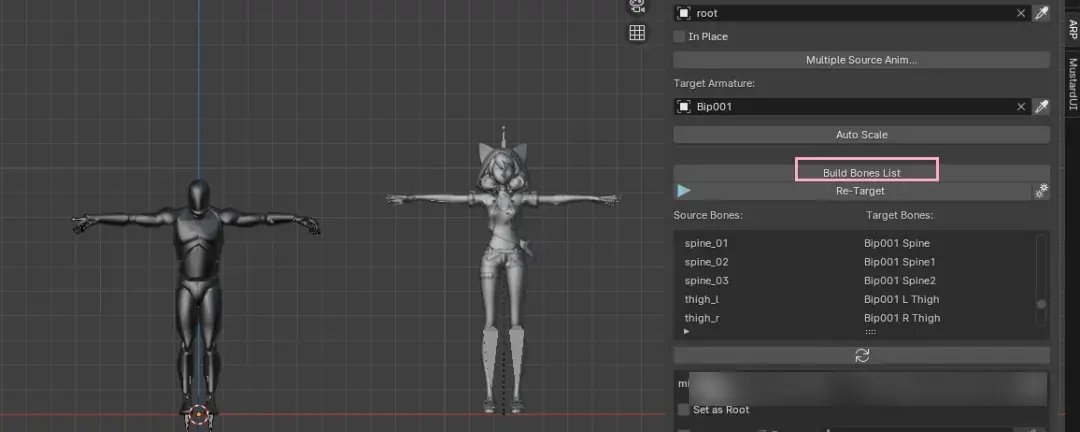
Click Build Bones List. Auto Rig Pro will automatically match corresponding bones between the source and target skeletons. This creates a mapping table that determines which source bone drives which target bone.
Critical Bones to Verify

After the auto-match, review each mapping carefully. If a bone is mismatched or unmapped:
- Find the unmapped bone in the list
- Click the target field next to it
- Manually select the correct corresponding bone from your target rig
- Pay special attention to hips, spine, and limb chains — these are the most critical for correct motion transfer

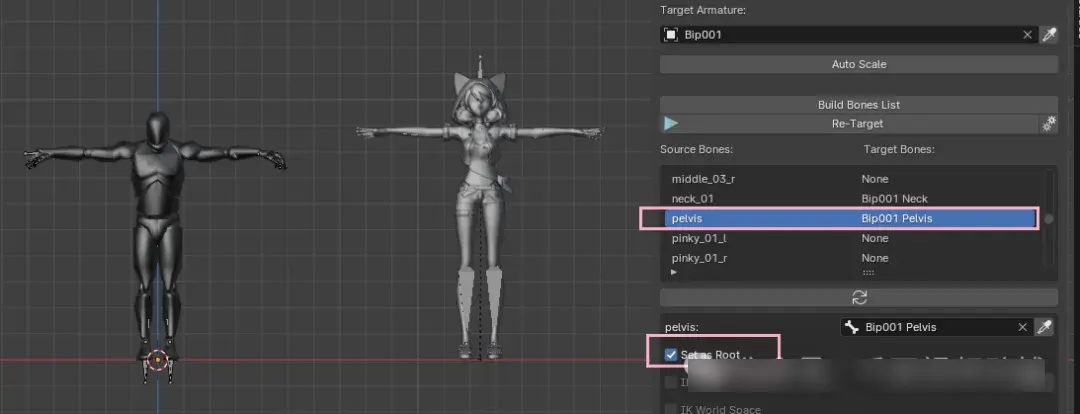
7 Set the Root Bone
Designate the Root bone in the mapping. The root bone is the top-level bone in the hierarchy — typically the hips or pelvis. It controls the overall position and movement of the character in world space.
Why the Root Bone Matters
- The root bone carries the character's global position (walking forward, jumping, etc.)
- If the root is mismatched, the character will animate in place without moving through space
- It's the parent of all other bones — getting it wrong cascades errors downward
- Correct root mapping ensures locomotion and translation data transfer properly
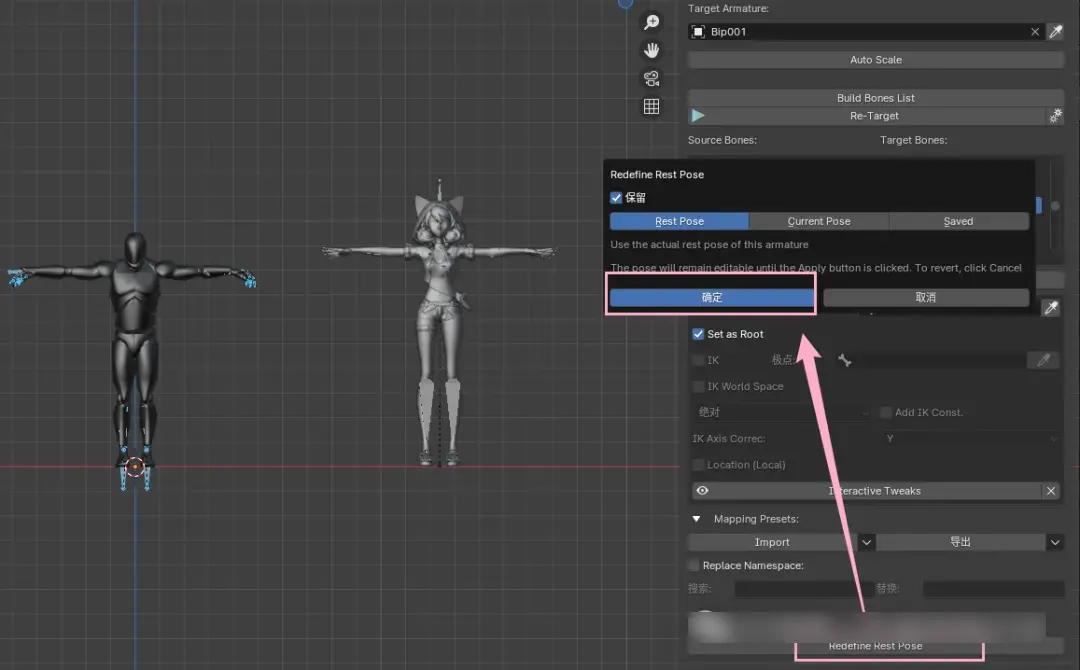
8 Redefine Tweaks
Click Redefine Tweaks. This step fine-tunes the retargeting parameters by adjusting secondary bone mappings:
- Finger bones: If your source has finger data, this maps individual finger joints
- Toe bones: Maps toe bones for accurate foot rolling during walk cycles
- Facial bones (if present): Maps jaw, eye, and brow bones
- Secondary controllers: Maps IK targets, pole vectors, and tweak bones
If your character doesn't have finger or facial rigs, this step will simply skip those mappings — that's fine for body-only animation.
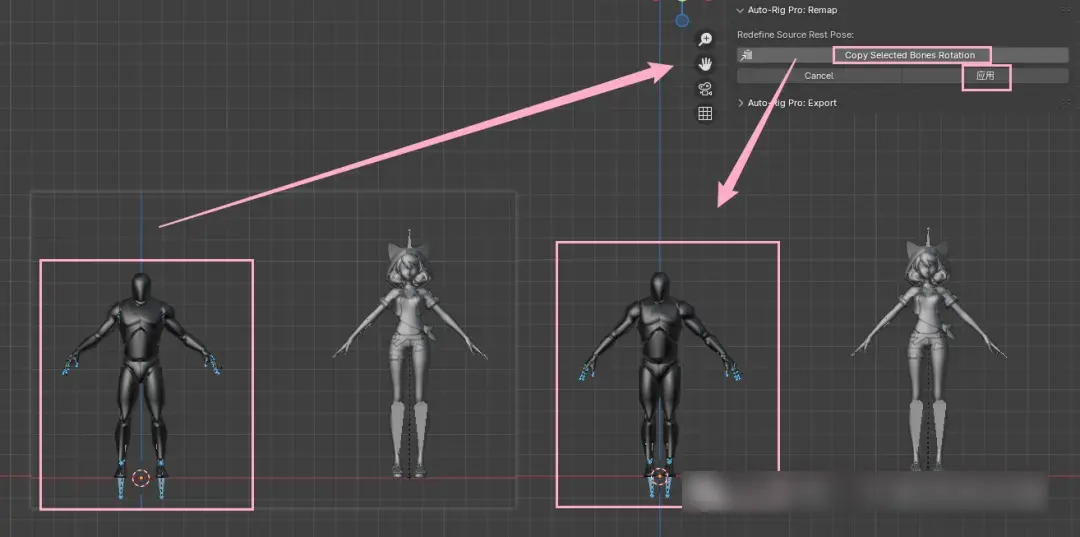
9 Copy Selected Bones Rotation
This is a crucial step that many users miss. If the source skeleton's rest pose (the default T-pose or A-pose) differs from the target skeleton's rest pose, the retargeted animation will have offset issues.
How to Fix Pose Offset
- Select the areas where the source skeleton's pose differs from the target's
- Click Copy Selected Bones Rotation
- The source skeleton will snap to the same pose as the target skeleton
- This aligns the rest poses so the animation transfers without rotational offset

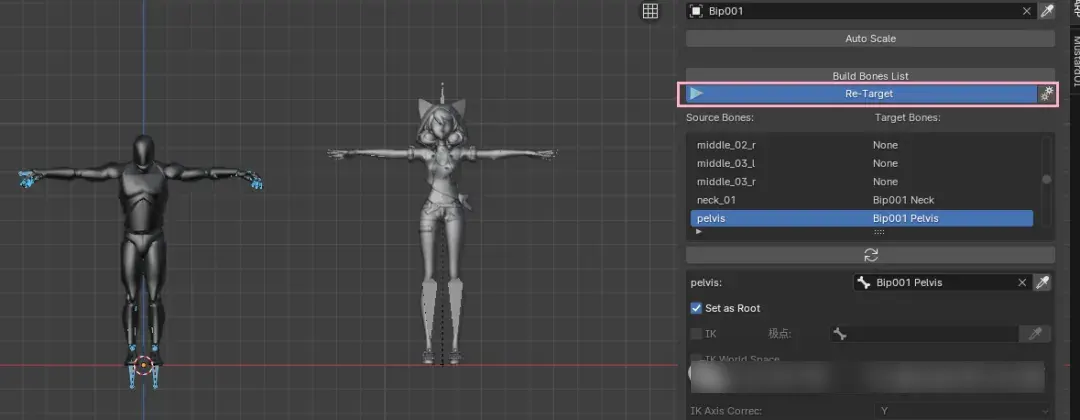
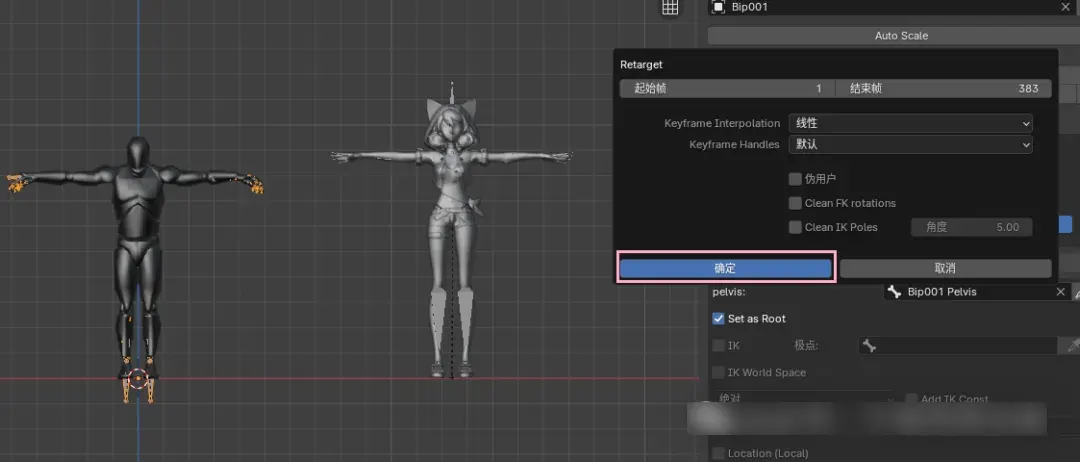
10 Execute Bone Remapping (ReTarget)
With all settings configured, click the ReTarget button to execute the bone remapping. Auto Rig Pro will transfer the animation from the source armature to your target character rig.
Post-Retargeting Verification
- Scrub the timeline: Play through the animation and check for obvious issues
- Check foot contact: Feet should plant correctly on the ground without sliding
- Verify limb positions: Arms and legs should move naturally without twisting
- Check extreme poses: Jump to keyframes with extreme poses and verify they look correct
- Test looping: If the animation is meant to loop, verify the first and last frames match
If everything looks good — congratulations! Your QuickMagic mocap animation is now retargeted onto your character. You can delete the source armature and export the animation from your target rig.

Pro Tips for QuickMagic → Blender Workflow
- Use FBX over BVH: FBX preserves more animation metadata, including bone roll and scale curves
- Match frame rates: Set Blender's scene FPS to match your QuickMagic export to avoid timing drift
- Save a bone mapping preset: If you retarget multiple animations to the same character, save the bone mapping for reuse
- Clean up before retargeting: Remove any unused bones from your target rig to simplify the mapping process
- Test with a simple animation first: Use a walk cycle to test your bone mapping before retargeting complex combat or dance animations
- NLA Editor for clips: After retargeting, use Blender's NLA Editor to split the animation into reusable action clips
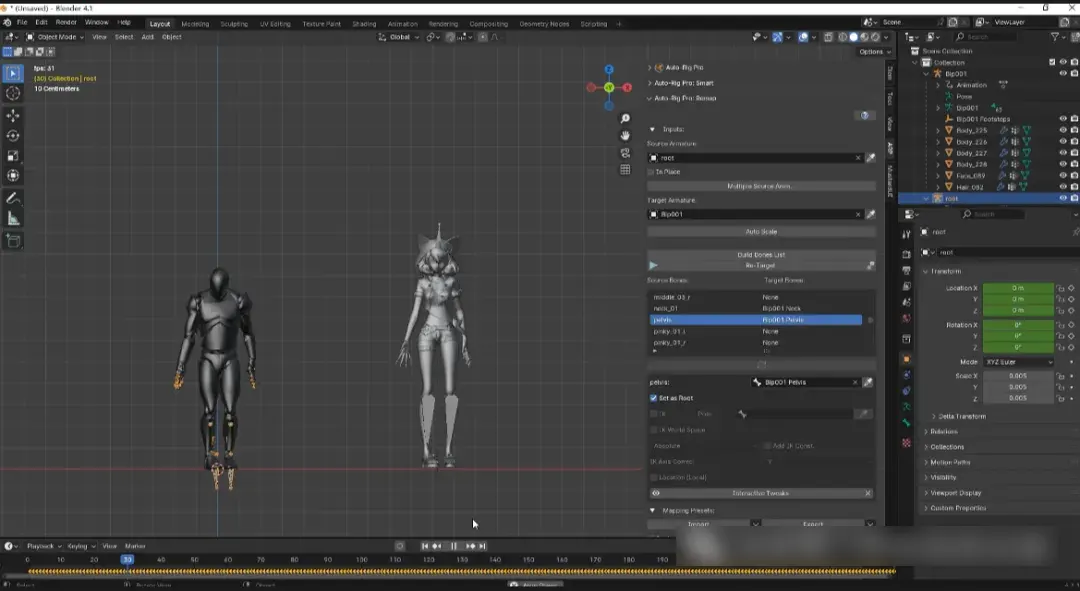
11. Done!!


FAQ
How do I remap bones in Blender?
Use the Auto Rig Pro add-on's Remap tool in Blender. Select the source armature (your mocap skeleton) and target armature (your character rig), enable Auto Scale for proportional matching, build the Bones List to auto-match corresponding bones, set the root bone, and click ReTarget to transfer the animation. The entire process takes about 5-10 minutes per animation.
What is bone remapping in Blender?
Bone remapping (also called retargeting) is the process of transferring animation data from one skeleton rig to another with a different bone structure. It maps each bone in the source skeleton to a corresponding bone in the target skeleton, allowing mocap animation to be applied to any character rig regardless of bone naming or hierarchy differences.
Do I need Auto Rig Pro to retarget mocap in Blender?
Auto Rig Pro is the most reliable and user-friendly retargeting tool for Blender, but it is not the only option. Blender also has built-in retargeting through the NLA Editor and constraints like Copy Transforms. However, Auto Rig Pro's Remap tool automates bone matching, proportional scaling, and pose alignment — saving significant manual work compared to constraint-based retargeting.
How do I fix bone mismatch during retargeting in Blender?
After building the Bones List in Auto Rig Pro, review the auto-matched pairs. If bones are mismatched, manually assign the correct source-to-target bone mapping. Common fixes include: ensuring the root bone is correctly set, checking that the rest poses match using Copy Selected Bones Rotation, and verifying that finger and toe bones are properly paired. Always test the retargeted animation by scrubbing the timeline after remapping.
What file format should I download from QuickMagic for Blender retargeting?
FBX is the recommended format for Blender retargeting. It preserves bone hierarchy, animation curves, and metadata better than BVH. When downloading from QuickMagic, select
FBX format, ensure the frame rate matches your Blender project (typically 30fps or 60fps), and verify the skeleton includes all the bones you need for your target character rig.