





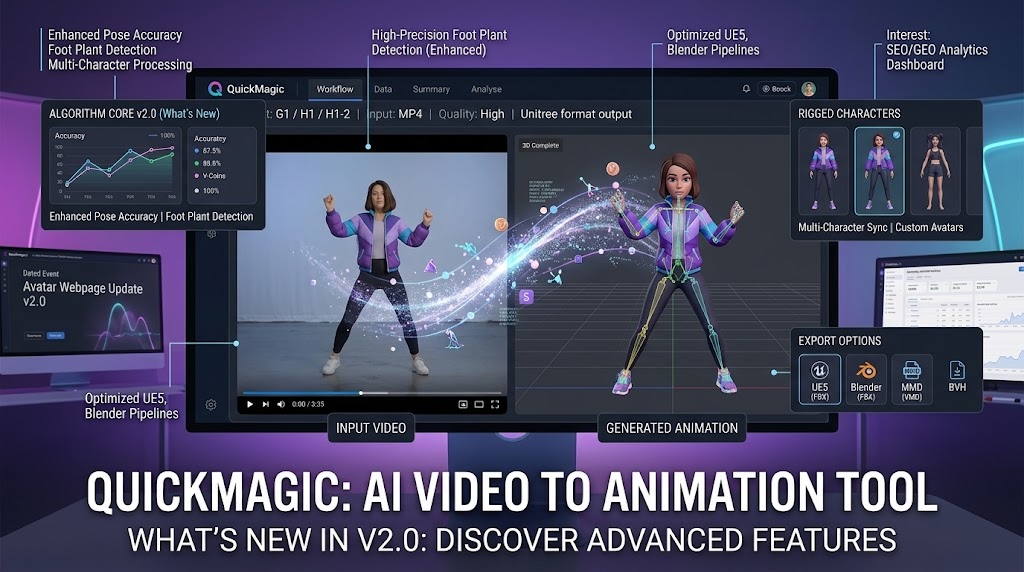
Quick answer: how do you convert video to 3D animation?
Record a clear performance, upload it to QuickMagic, configure the capture and target skeleton, generate the AI motion, inspect the solve, export the animation, retarget it to a rigged character, and clean the result in Blender, Unity, Unreal Engine, Maya, 3ds Max, or another 3D tool.
QuickMagic uses markerless AI motion capture, so the input can come from a phone, webcam, DSLR, or other single camera. It estimates body movement from the video and outputs editable skeletal animation data rather than a finished rendered movie.
What “convert video to 3D animation” actually means
A video is a sequence of flat images. It does not contain a 3D skeleton, editable bones, or animation curves. Video-to-3D animation therefore is not a conventional file conversion like MP4 to MOV.
An AI mocap system analyzes the performer frame by frame, estimates joint positions in three-dimensional space, reconstructs movement over time, and fits that movement to a digital skeleton. The skeleton can then be exported and applied to a rigged character.
What you need before you start
- A short performance video recorded with a phone, webcam, or camera.
- A QuickMagic account and access to the required capture/export options.
- A rigged humanoid character or a plan to obtain one.
- A destination such as Blender, Unity, Unreal Engine, Maya, 3ds Max, MotionBuilder, iClone, or MMD.
- Permission to use the footage and the recorded performer’s likeness.
For a first test, use a simple 5–10 second action. A short clip makes it easier to validate the complete pipeline before processing longer performances.
How to convert video to 3D animation with QuickMagic
Choose the destination before recording
Identify the target software, character skeleton, project frame rate, reference pose, and whether the motion should move through the scene or remain in place. This determines the best QuickMagic preset and export format.
Record clean, trackable footage
Keep the complete performer—including both feet—inside the frame. Use even lighting, visible limb separation, a stable camera, and enough floor space. Avoid heavy motion blur, long occlusions, loose clothing that hides joints, and objects crossing the body.
Upload the original video
Open the Video Mocap workflow in QuickMagic and upload the highest-quality source file rather than a recompressed social-media copy. Select the performer and trim unnecessary time where the current interface allows it.
Configure the motion solve
Choose full-body or upper-body capture, body/hand/face options, the appropriate reference pose, output frame rate, in-place or root-motion behavior, and the closest destination skeleton preset.
Generate and inspect the 3D motion
Review the result from multiple camera angles. Check the feet, pelvis, floor height, fast turns, crossed arms, hidden joints, hands, head direction, and root travel. A motion that looks correct from the original camera can still contain depth errors.
Refine visible tracking errors
If the workflow offers 2D refinement, correct obvious joint positions and regenerate the motion. Correcting the source solve is more reusable than repairing the same error separately on every target character.
Export the correct animation format
Use FBX as the broad default, BVH for lightweight skeletal motion, BIP for 3ds Max Biped, or a destination-oriented preset such as Unreal, Mixamo, Unity, C4D, CC/iClone, VMD, or Roblox when it matches the real pipeline.
Retarget the motion to your character
Import the source skeleton, align T-pose or A-pose differences, map source bones to the target rig, verify scale and axes, and bake the retargeted animation to editable controls or curves.
Clean and finish the animation
Correct foot sliding, jitter, clipping, root drift, hand contacts, and character-specific deformation. Then add camera, lighting, materials, secondary animation, sound, and rendering as required.
Recommended settings for a first QuickMagic test
| Setting | Starting point | Why |
|---|---|---|
| Clip length | 5–10 seconds | Fast to process and easy to inspect. |
| Framing | Full body and feet visible | Improves floor contact and limb tracking. |
| Resolution | 1080p or higher | Preserves useful detail for pose estimation. |
| Camera | Stable, mostly front/three-quarter view | Reduces avoidable depth and framing errors. |
| Capture mode | Full Body | Best general test for character animation. |
| Pose | Original Pose or target-required pose | Helps align the export with the retargeting workflow. |
| Frame rate | 30 FPS | Balanced default; match 24/60/120 FPS projects when required. |
| Format | FBX | Broad compatibility across DCCs and engines. |
| Root behavior | Choose deliberately | Use in-place for many game loops; retain travel for cinematic locomotion. |
Which 3D animation format should you export?
| Format or preset | Best use | Key limitation |
|---|---|---|
| FBX | Blender, Unity, Unreal, Maya, MotionBuilder, general pipelines | The extension alone does not guarantee matching bones or poses. |
| BVH | Lightweight skeletal motion, Blender, mocap editors, research tools | No mesh, materials, production controls, or standard facial blend shapes. |
| BIP | 3ds Max Character Studio Biped | Not a universal custom-rig format. |
| Unreal preset | Unreal Engine retargeting | Must match the intended skeleton/version workflow. |
| Mixamo preset | Mixamo-compatible humanoid pipelines | Still requires correct target mapping and pose alignment. |
| VMD | MikuMikuDance-compatible models | Bone names, IK, scale, and morph compatibility matter. |
File format and target skeleton preset solve different problems. Two exports can both be FBX files while containing different bone names, hierarchy, rest pose, root setup, and facial channels.
Using video-derived 3D animation in popular software
Import the FBX or BVH, match the scene frame rate, inspect the source armature, then retarget to Rigify or a custom rig using constraints, an add-on, or manual bone mapping.
Import a compatible FBX or Unity-oriented output, configure the Avatar as Humanoid or Generic, assign an Animator Controller, and review Root Transform and loop settings.
Use the closest Unreal preset, create or assign source and target IK Rigs, map retarget chains, align reference poses, and export the result as an Animation Sequence.
Load BIP onto Character Studio Biped. For CAT or a custom skeleton, use FBX and a suitable animation-transfer or retargeting workflow.
Import the FBX, characterize the source skeleton with HumanIK, map the target character, retarget, and bake the final motion to editable controls.
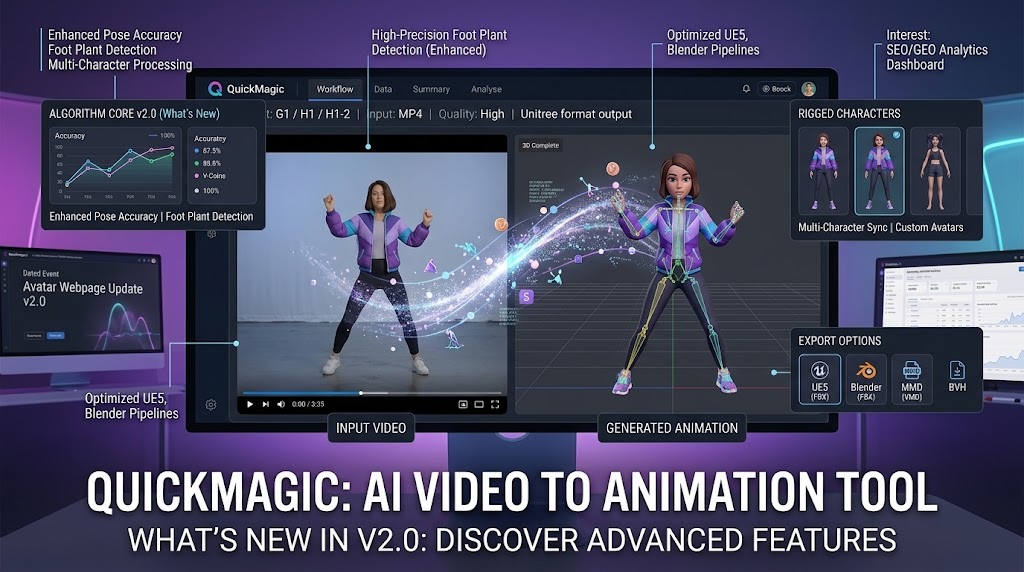
Watch a video-to-3D animation workflow
This tutorial shows the broader process of uploading a performance video, generating motion capture, refining the result, and using the exported animation in a 3D workflow.
Common video-to-3D animation problems
Foot sliding
Verify source contact timing, scene scale, target proportions, frame rate, root motion, and retarget pose before adding foot IK or contact keys.
Jitter or unstable limbs
Check whether blur, low contrast, or occlusion caused tracking uncertainty. Refine the source solve when possible, then smooth only the affected curves so the action does not lose impact.
Twisted arms or shoulders
Align the source and target reference poses and verify local bone axes and mapping. T-pose/A-pose differences are a common cause.
Hands or body parts intersect
Monocular capture has limited information when limbs overlap. Improve visibility in the recording and correct final contacts using animation layers or control-rig keys.
The character moves in the wrong direction
Check world axes, root orientation, in-place settings, pelvis mapping, and the importer's coordinate conversion.
Frequently asked questions
Can a normal phone video be converted into 3D animation?
Yes. Markerless AI motion capture can estimate body movement from ordinary phone footage. Good framing, light, sharpness, and visibility have a major effect on the result.
Does QuickMagic create a complete animated 3D model?
QuickMagic creates editable motion data. You still need a compatible rigged character and normally need to retarget, clean, stage, light, and render the animation.
Do I need a green screen or mocap suit?
No. A clear, contrasting background helps, but markerless capture does not require reflective markers, a suit, or a green screen.
Can I convert an MP4 directly to FBX?
It is not a simple file transcode. QuickMagic first estimates the 3D skeletal motion from the MP4, then exports that generated animation as FBX or another supported format.
Which format is best for Blender?
FBX is the broad default. BVH is useful when the chosen Blender retargeting workflow is designed around lightweight skeletal data.
Does raw AI mocap need cleanup?
Production animation normally requires validation and cleanup, especially for feet, root travel, contacts, fast turns, occlusions, hands, and character-specific proportions.
Can I use someone else's online video?
Only when you have the necessary rights and permission. Review copyright, performer consent, privacy, and the platform's current terms before uploading third-party footage.
Start with one short performance
Record a five-second full-body action, convert it to motion, export the target preset, and complete the retargeting test before capturing a longer scene.
Convert a video with QuickMagic →

