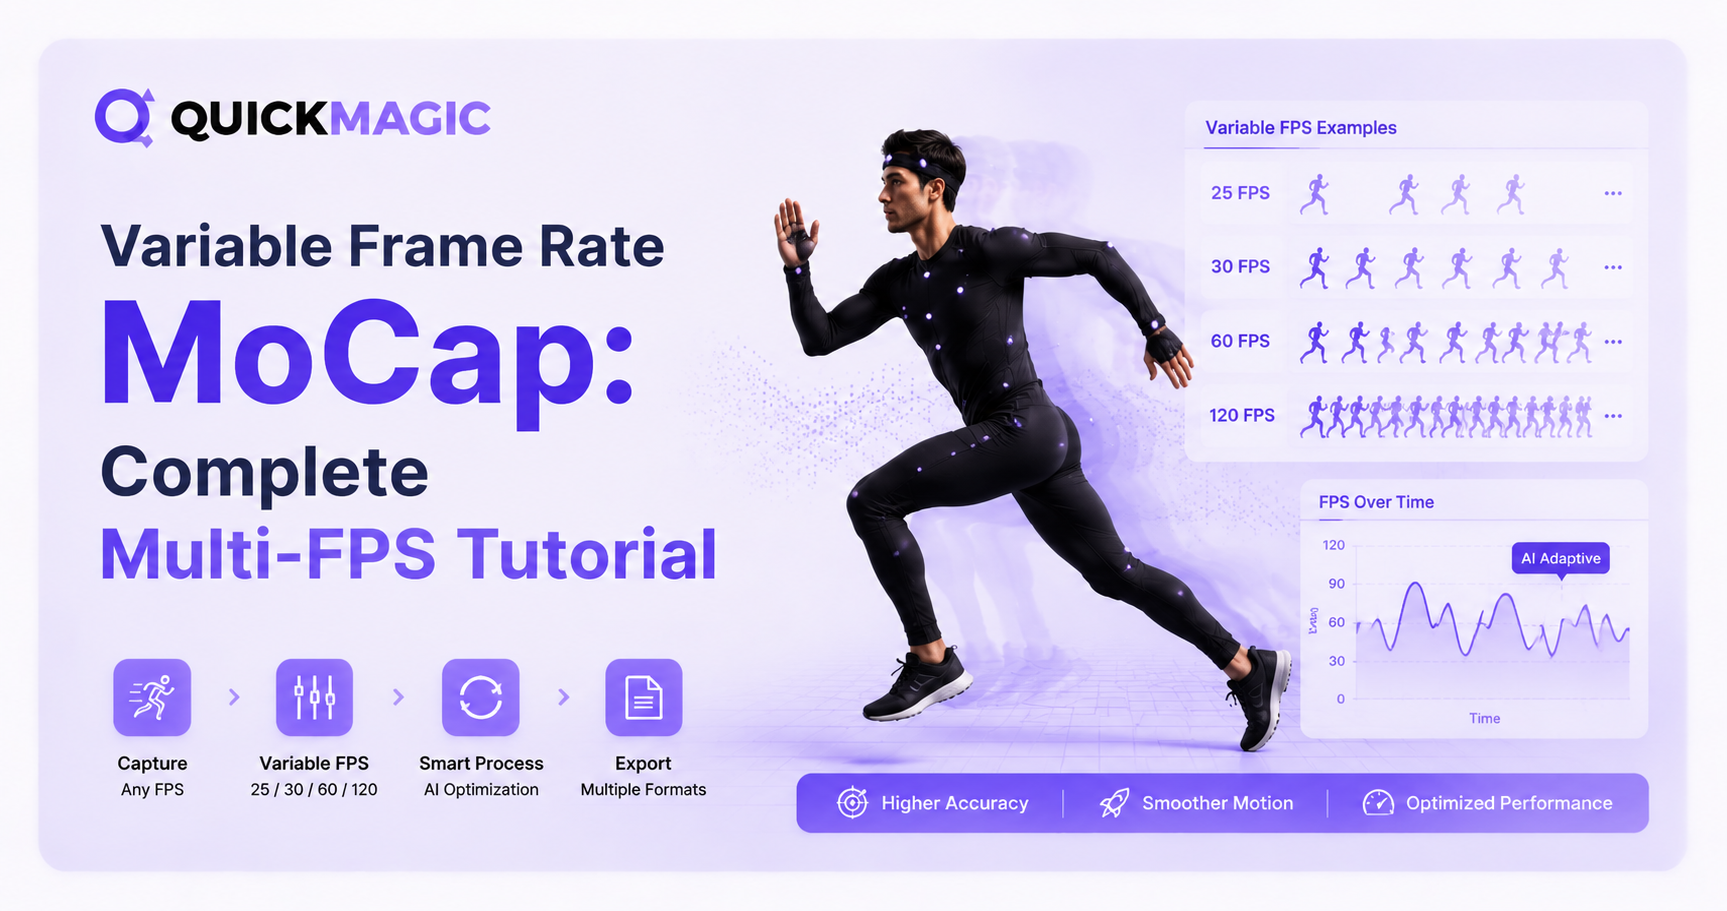
Variable frame rate motion capture lets you export AI-generated animation data at 24, 30, 60, or 120 frames per second (FPS) — matching your target production pipeline without manual post-conversion. This tutorial covers everything from choosing the right frame rate to importing multi-FPS FBX files into Maya, Unreal Engine, Unity, Blender, iClone, and 3ds Max.
QuickMagic's multi-frame rate output function supports 24/30/60/120 FPS, enabling your motion capture data to match any downstream production workflow — from cinematic 24fps films to 120fps slow-motion game cinematics — directly from a single AI capture session, with no suits, markers, or optical camera rigs required.
Why Frame Rate Matters in Motion Capture
Frame rate determines how many discrete motion samples are recorded per second of animation. In motion capture, the output frame rate directly affects motion smoothness, file size, slow-motion flexibility, and compatibility with your target production pipeline.
Choosing the wrong frame rate creates downstream problems: 30fps mocap data imported into a 60fps game engine produces stuttering animations; 120fps data exported to a 24fps film pipeline wastes storage and can introduce interpolation artifacts. The key is matching your capture output frame rate to your target production frame rate from the start.
Traditional motion capture systems often capture at a fixed high frame rate (typically 60 or 120 FPS) and require manual resampling in post-production. AI motion capture tools like QuickMagic solve this by letting you select the output frame rate at the point of generation — eliminating the resampling step entirely.
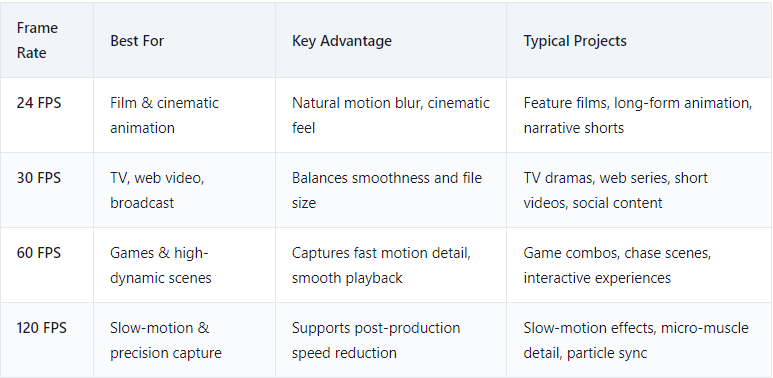
Frame Rate Comparison: Which FPS Should You Choose?
The table below summarizes the four frame rates supported by QuickMagic's multi-FPS output and their ideal use cases:
24 FPS: The Cinematic Standard
24 FPS is the traditional frame rate of cinema, dating back to the 1920s. It produces natural motion blur that the human eye perceives as "cinematic" — a look audiences associate with high-budget film production. Use 24 FPS when your motion capture data is destined for:
· Feature films and theatrical releases
· Long-form animated narratives
· Cinematic cutscenes in games where a "film look" is desired
· Any project where the final delivery format is 24p
Quick tip: 24 FPS captures fewer motion samples per second, so extremely fast movements (martial arts, sports) may lose detail. For high-speed action, consider capturing at 60 or 120 FPS and conforming down to 24 FPS in post for maximum motion detail with a cinematic delivery frame rate.
30 FPS: The Universal Standard
30 FPS is the standard for television broadcast, web video, and most social media platforms. It offers a balance between motion smoothness and manageable file sizes, making it the most versatile frame rate for general-purpose content. Use 30 FPS for:
· TV dramas and web series
· YouTube and social media content
· Corporate videos and product demos
· Broadcast-quality animation
60 FPS: The Game Developer's Choice
60 FPS is the standard frame rate for modern video games and high-dynamic digital content. It captures twice as many motion samples as 30 FPS, preserving fast action details that would be lost at lower rates. Use 60 FPS when your motion capture data targets:
· Video game character animations (locomotion, combat, interactions)
· Real-time interactive experiences (VR/AR applications)
· High-dynamic scenes with rapid movement (chase sequences, sports)
· Any project requiring smooth playback at 60 Hz or higher
60 FPS is the recommended default for game development pipelines. Most game engines — Unreal Engine, Unity, and others — default to 60 FPS or higher for real-time rendering, and matching your mocap output to this rate avoids resampling artifacts.
120 FPS: Slow-Motion and Precision Capture
120 FPS captures four times as many motion samples as 30 FPS, enabling smooth slow-motion playback at 1/4 speed without visible stuttering. This frame rate is essential for:
· Slow-motion visual effects and cinematic sequences
· High-precision motion analysis (muscle micro-tremors, particle synchronization)
· Post-production speed ramping (variable speed effects)
· Motion data that will be retimed or remapped in editing
Trade-off note: 120 FPS files are significantly larger than lower frame rate equivalents — a 120 FPS FBX file is roughly 5x the size of a 24 FPS file for the same animation duration. Use 120 FPS only when slow-motion capability or extreme motion detail is required.
How to Use Variable Frame Rate MoCap: Step-by-Step Workflow
This section walks through the complete workflow from video upload to software-specific import. The process works identically whether you're capturing body motion, hand tracking, or facial animations.
Step 1: Upload Your Video to QuickMagic
1. Log in to your QuickMagic account
2. Upload a video of the motion you want to capture — this can be recorded on any camera, including a smartphone
3. Select your capture mode: full body, half body, hand tracking, or face capture
4. Wait for the AI to process your video and generate 3D motion data
Best practices for source video: Use 60 FPS source video for fast movements to minimize motion blur. Ensure the subject is fully visible in frame with good lighting and clear contrast against the background. Fixed camera positions produce more accurate results than moving cameras.
Step 2: Select Your Output Frame Rate
Before generating and downloading your motion capture data, select the multi-frame rate output:
1. In the QuickMagic interface, locate the Frame Rate setting
2. Choose from 24, 30, 60, or 120 FPS based on your target production pipeline
3. Select your export format (FBX is recommended for maximum compatibility; QuickMagic also supports BVH, BIP, VMD, Mixamo, UE4, UE5.5, UE5.6, CC & iClone, Roblox, and more)
4. Click Generate and then Download your motion data file
The frame rate you select here is embedded directly into the exported file, ensuring your downstream software reads the correct timing information automatically.
Step 3: Import into Your Target Software
The import process varies by software. Below are detailed guides for each major 3D application.
Software-Specific Import Guides
Maya
Maya is the industry standard for film and television animation, and it handles multi-FPS mocap data natively through its HumanIK system.
Import workflow:
1. Open Maya and set your scene frame rate to match your mocap output (Window → Settings/Preferences → Preferences → Settings → Time → select 24/30/60/120 FPS)
2. Drag and drop the FBX file into the Maya viewport, or use File → Import
3. Maya automatically reads the embedded frame rate from the FBX metadata
4. Use HumanIK (Window → Animation Editors → HumanIK) to define your source skeleton and retarget to your character rig
5. Bake the animation to your character's control rig for final cleanup
Common issue: If the animation plays at the wrong speed, check that your Maya scene frame rate matches the FBX output frame rate. Mismatches cause the timeline to interpret frame timing incorrectly.
Unreal Engine 4 / 5 / 5.6
Unreal Engine is the leading real-time engine for game development and virtual production, with robust FBX animation import tools.
Import workflow:
1. Open your UE project and navigate to the Content Browser
2. Drag and drop the FBX file into your desired folder
3. In the FBX Import Options dialog:
· Set Import As to "Animation" (if the FBX contains only animation data)
· Select your target Skeleton asset (e.g., SK_Mannequin_Skeleton for the default UE5 Mannequin)
· Check Import Animations
· Set Frame Rate to match your mocap output, or leave on auto-detect
4. Click Import — the animation sequence appears in your Content Browser
5. Use UE5's IK Retargeter if your character uses a different skeleton than the source mocap
Common issue: UE5 defaults to 30 FPS. If your mocap was exported at 60 or 120 FPS, the engine can auto-resample on import, but for best results, match your project's target frame rate to your mocap output.
Unity
Unity's Mecanim animation system handles FBX mocap data through the Humanoid rig configuration.
Import workflow:
1. Drag and drop the FBX file into your Unity Project window
2. Select the FBX in the Project panel and open the Rig tab in the Inspector
3. Set Animation Type to "Humanoid" for standard bipedal characters
4. Click Configure Avatar to verify bone mapping (Unity auto-detects most bones)
5. Switch to the Animation tab to verify clips, set loop times, and configure root motion
6. Click Apply — your mocap animation is ready for the Animator Controller
Common issue: Unity defaults to 30 FPS for animation clips. If your FBX was exported at 60 or 120 FPS, Unity will resample automatically, but verify in the Animation tab that the clip length and timing are correct.
Blender
Blender is a popular open-source 3D suite with strong motion capture support.
Import workflow:
1. Open Blender and go to File → Import → FBX
2. Select your QuickMagic FBX file
3. In the import settings panel, verify the Manual Scale and Animation options are enabled
4. Blender automatically reads the frame rate from the FBX metadata
5. Set your scene frame rate to match (Output Properties → Frame Rate) for accurate playback
6. Use the NLA Editor or Rigify retargeting add-ons to apply the motion to your character
Common issue: Blender's default frame rate is 24 FPS. If your mocap was exported at a different rate, change the scene frame rate in Output Properties to match before playback.
iClone
iClone is designed for real-time animation and virtual production, with built-in motion capture pipeline support.
Import workflow:
1. Drag and drop the FBX file into the iClone viewport
2. A frame rate selection dialog appears — manually select the target frame rate (24/30/60/120 FPS)
3. Confirm import — iClone applies the motion to the current character
4. Use iClone's Motion Layer editing tools for further refinement
iClone is particularly well-suited for virtual human short videos and animated micro-dramas, where flexible frame rate switching meets different platform requirements.
3ds Max
3ds Max is widely used for architectural visualization, product animation, and game asset creation.
Import workflow:
1. Drag and drop the FBX file into the 3ds Max viewport
2. Open the Time Configuration dialog (bottom-right corner of the interface)
3. Adjust the frame rate parameter to match your mocap output (24/30/60/120 FPS)
4. The animation loads onto the imported skeleton
5. Use CAT (Character Animation Toolkit) or Biped for retargeting to your character
3ds Max is ideal for architectural animation and product demonstrations where precise control over motion capture movements and camera rhythm is required.
Best Practices for Multi-FPS Motion Capture
Match Capture Input to Output
For the highest quality results, record your source video at a frame rate equal to or higher than your desired output frame rate. If you plan to export at 120 FPS for slow-motion, capture your source video at 120 FPS or higher to preserve motion detail. QuickMagic's AI processes the source video frame-by-frame, so higher source frame rates produce more accurate motion data.
Choose Frame Rate by Use Case, Not by "Higher Is Better"
A common mistake is always selecting the highest available frame rate. 120 FPS files are 5x larger than 24 FPS files for the same animation duration, with no benefit if your final delivery is 24 FPS cinema. Match your output frame rate to your delivery format:
· Delivering for cinema? Export at 24 FPS
· Delivering for web/broadcast? Export at 30 FPS
· Delivering for games? Export at 60 FPS
· Need slow-motion flexibility? Export at 120 FPS
Verify Frame Rate Consistency Across Your Pipeline
The most common multi-FPS issue is frame rate mismatch between the mocap output and the target software's project settings. Before importing, always verify:
1. The FBX file's embedded frame rate (check in your export settings)
2. The target software's project/scene frame rate setting
3. The final delivery format's frame rate requirement
When all three match, your animation will play at the correct speed with no resampling artifacts.
Use Anti-Penetration and Physics Features
QuickMagic includes intelligent built-in anti-penetration correction that prevents limb interpenetration in the generated motion data. Enable this feature during generation, especially for fast movements or self-contact poses, to reduce cleanup time in your target software.
Troubleshooting: Common Multi-FPS Issues
Animation Plays Too Fast or Too Slow After Import
Cause: Frame rate mismatch between the FBX file and the target software's project settings.
Solution: Check your software's frame rate setting and ensure it matches the QuickMagic export frame rate. In Maya: Preferences → Settings → Time. In Unreal: Project Settings → Engine → General Settings → Framerate. In Unity: Edit → Project Settings → Time → Fixed Timestep. In Blender: Output Properties → Frame Rate.
Animation Appears Choppy or Stutters
Cause: The source video had a low frame rate (e.g., 30 FPS) but was exported at a higher frame rate (e.g., 120 FPS), causing the AI to interpolate frames that don't contain real motion data.
Solution: Record source video at 60 FPS or higher for fast movements. If the source is already low FPS, export at the same rate as the source to avoid interpolation artifacts.
File Size Is Unexpectedly Large
Cause: Exporting at 120 FPS when 30 FPS would suffice.
Solution: Choose the lowest frame rate that meets your project requirements. 120 FPS files contain 4x the data of 30 FPS files for the same duration.
Motion Data Doesn't Align with Character Rig
Cause: Skeleton mismatch between the mocap source and the target character rig.
Solution: Use your software's retargeting tools (HumanIK in Maya, IK Retargeter in UE5, Humanoid Avatar in Unity) to map the source skeleton to your character's bone hierarchy. QuickMagic's FBX output uses a standard humanoid skeleton that's compatible with all major retargeting systems.
Frequently Asked Questions
What is variable frame rate motion capture?
Variable frame rate motion capture is the ability to export motion capture animation data at different frame rates — typically 24, 30, 60, or 120 FPS — from a single capture session. This lets you match the output frame rate to your target production pipeline (film, TV, games, or slow-motion VFX) without manual post-conversion or resampling. QuickMagic's multi-FPS output supports all four frame rates directly from the AI capture interface.
Which frame rate should I use for motion capture?
Choose your frame rate based on your final delivery format: 24 FPS for cinema and narrative film, 30 FPS for TV and web video, 60 FPS for video games and real-time interactive content, and 120 FPS for slow-motion effects and high-precision motion analysis. The golden rule is to match your mocap output frame rate to your target production frame rate.
Can I change the frame rate after exporting motion capture data?
Yes, but it's not recommended. While most 3D software can resample animation data to a different frame rate on import, this introduces interpolation that can cause motion artifacts — especially when downsampling from 120 FPS to 24 FPS. For best results, select the correct frame rate in QuickMagic before exporting your FBX file.
Does QuickMagic support multi-frame rate output for all capture types?
Yes. QuickMagic's multi-FPS output (24/30/60/120 FPS) works across all capture modes, including full-body motion, half-body capture, hand tracking, and facial animation. The frame rate setting applies to the final exported motion data regardless of capture type.
What file formats does QuickMagic support for multi-FPS export?
QuickMagic supports FBX (recommended for maximum compatibility), BVH, BIP, VMD, Mixamo, UE4, UE5.5, UE5.6, CC & iClone, and Roblox formats. All formats support multi-frame rate output. FBX is the universal standard supported by Maya, Unreal Engine, Unity, Blender, 3ds Max, MotionBuilder, and most other 3D applications.
Is 120 FPS motion capture better than 60 FPS?
Not necessarily. 120 FPS captures more motion detail and enables slow-motion playback, but it produces files 2x larger than 60 FPS. If your final delivery is 60 FPS (typical for games), exporting at 60 FPS is optimal. Use 120 FPS only when you need slow-motion capability or extreme motion precision for post-production retiming.
Do I need special equipment for variable frame rate motion capture?
No. QuickMagic is an AI-powered markerless motion capture system that works with any standard video — including smartphone footage. There are no motion capture suits, markers, or optical camera rigs required. Simply upload your video, select your desired frame rate, and download the exported motion data.
How does AI motion capture compare to traditional mocap for frame rate control?
Traditional optical motion capture systems (like Vicon or OptiTrack) typically capture at a fixed high frame rate (120-240 FPS) and require manual resampling in MotionBuilder or similar software to match target frame rates. AI motion capture tools like QuickMagic let you select the output frame rate at the point of generation, eliminating the resampling step and streamlining the workflow.