





What is 3D previs—and how do you start?
3D previs is a rough animated plan for a scene. In the workflow shown here, you add simple characters, choose actions, arrange their timing and inspect the framing. Start with one clear scene beat and one performer; add complexity only when it helps you answer a staging question.
A previs scene does not need polished materials or perfect motion to be useful. It needs to show who moves, what happens, when the audience should notice it and whether the camera can see it.
Scope of this tutorial: the steps use visible controls and scene states in the user-supplied QuickMagic 3D Previs recording. Composition exercises and review checklists are additional editorial guidance. No live account test, export-format verification or narration transcript is claimed. Your current interface and access may differ.
Watch the 3D Previs walkthrough
The chapter buttons jump to observed interface states. They are visual navigation points, not a transcript. For this tutorial, focus on the character tools, action library, timeline and camera preview rather than unrelated product screens later in the recording.
A simple 3D previs workflow
- 01Start with a simple scene
- 02Add and position a character
- 03Choose an action
- 04Arrange the timeline
- 05Add a second character
- 06Review the camera framing
- 07Save and validate the output
Before opening a large library of motions, write one sentence describing the scene: “One performer finishes a movement while a second performer reacts.” That is enough to test timing, separation and framing without building a full production sequence.
Step 1. Read the workspace and define the shot
The video begins inside the 3D Previs Platform. It does not show a reliable navigation path from account sign-in, so start from the Previs workspace available in your version rather than following an invented menu sequence.

| Area | What is visible | How to use it in this tutorial |
|---|---|---|
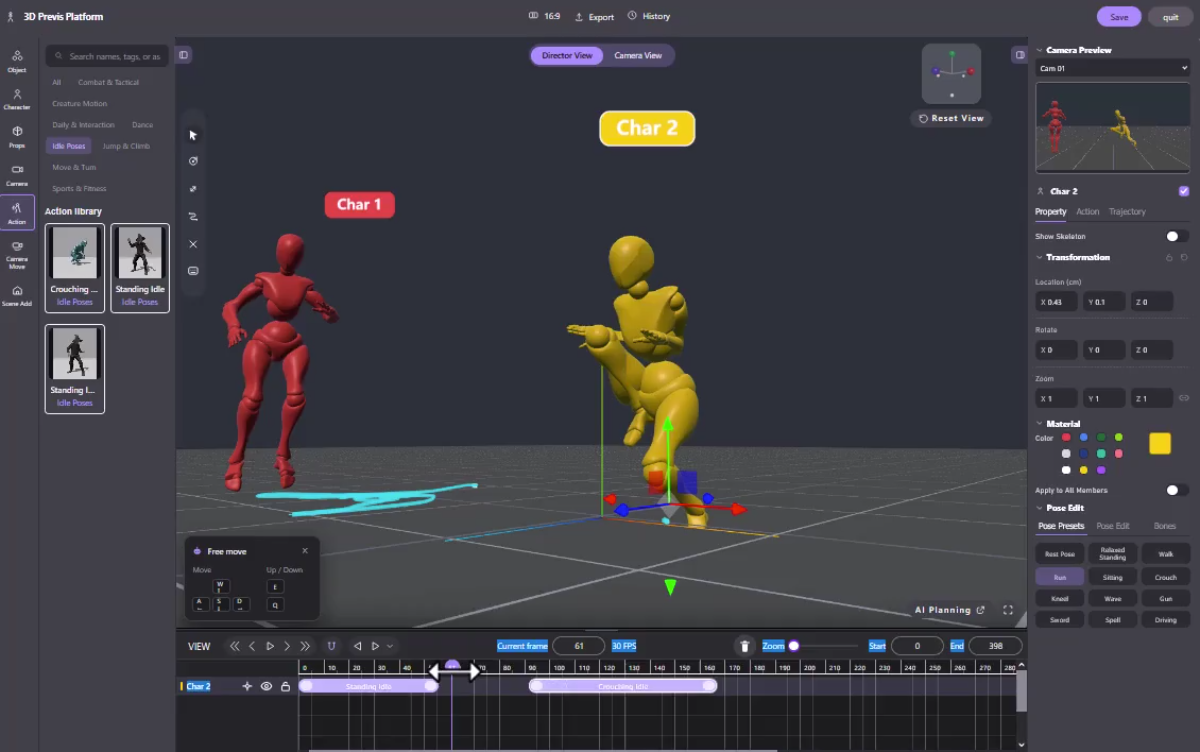
| Left toolbar | Object, Character, Props, Camera, Action and other sections | Find characters and actions for the blockout. |
| Center viewport | Director View and Camera View controls | Inspect staging and distinguish the workspace from the shot. |
| Right panel | Camera Preview and selected-object properties | Check framing and which object you are editing. |
| Bottom timeline | Frame ruler, current frame, FPS, start/end and tracks | Review when each action happens. |
The example displays 16:9 and 30 FPS. Treat these as observed settings, not mandatory values. Choose your intended presentation format early so that you do not approve a composition that later gets cropped.
Step 2. Add your first character
Open Character in the left toolbar. The recording shows a Single Character option and then a red character labeled Char 1. Start with a single performer so you can learn the relationship between selection, properties and the timeline.

Select the performer and inspect the property panel. Later frames show a transform gizmo and location/rotation fields. Use these controls deliberately to establish where the performer starts and which direction they face.
Keep the character away from the edge of the camera preview for the first test. There is little value in fine-tuning an action that the shot cannot see. A plain colored stand-in is sufficient while you are deciding staging.
Step 3. Choose an action and preview it
Open Action. The recording shows an action library with categories including Dance and Idle Poses. Browse for a motion that approximates the scene beat; your first choice only needs to communicate the action clearly.
Apply an action to the selected performer using the interaction available in your build, then confirm that a motion clip appears on the correct track. The recording progresses from a static character to labeled purple clips and animated playback. Check the result before adding another clip.

Watch the whole movement. Does it travel farther than expected? Does the performer turn away from the audience? Does the end pose support the next beat? These questions matter more in previs than whether the motion is already final-quality.
The cyan ground path visible in this sequence can help you inspect travel, but it is not a guarantee that spacing or collisions are correct. Judge the moving character in the actual scene.
Step 4. Arrange the action clips on the timeline
The timeline is where individual motions become a sequence. Around 01:45, the recording shows a dance-related clip followed by Standing Idle. Review the boundary between them, not only the middle of each action.

Use the timeline controls to inspect the start, end and placement of your clips. When dragging a clip or its edge, watch what actually changes: moving an action, trimming it and changing its playback rate are different operations. Do not assume an edge drag has a particular effect without replaying the result.
At 30 FPS, a 30-frame interval lasts one second. You can use that relationship to plan a pause or reaction, while checking the displayed range in your own scene. Frame numbers are not interchangeable with seconds.
- Preview the transition at normal speed.
- Scrub around the join to find a sudden pose or position change.
- Check whether a gap is intentional.
- Confirm that the scene's end range includes the final action.
An action library does not by itself establish seamless blending. If a join is rough, adjust the choice or timing of the actions, or flag it for later animation cleanup rather than treating it as finished.
Step 5. Add a second performer and coordinate the scene
Around 01:55, a yellow Char 2 appears beside the red performer. The recording then explores pose controls and adds actions to the second character. This demonstrates separate character work; it does not establish a maximum cast size.

Give the second character a reason to be in the scene. They might observe, react, move into position or provide a contrasting action. If both performers move with equal intensity at once, the audience may not know where to look.
Review three relationships together: distance, facing direction and timing. A reaction can read incorrectly if it begins before the event, faces away from the relevant performer or is hidden behind another body.
Move the second action earlier or later to test the beat. The later timeline work in the video shows separated clips on Char 2's track; inspect gaps and playback behavior in your own version rather than assuming the software fills them with a specific hold or blend.
Step 6. Check what the camera sees
The recording keeps a Camera Preview panel visible while the workspace view changes. Use that distinction when reviewing your scene: a composition that looks clear from the editor's orbit may not read from the selected camera.
Recommended framing pass: inspect the opening pose, the widest movement and the final pose from the intended shot camera. Keep important hands, feet and reactions visible where the scene requires them. Look for characters overlapping into a confusing silhouette.
The interface shows Camera View and camera-related tools, but the supplied sequence does not establish a complete animated-camera setup. Treat camera-move design as a separate task to verify in the current tool, not as a feature demonstrated by simply orbiting Director View.
Step 7. Save and check the available output
Save, History and Export are visible in the top bar. Save at meaningful milestones and verify that your project state has been retained. The recording does not show a completed export, its file type or its resolution.
Open the available export panel in your account and confirm what it produces. A review video, an animation file and a complete editable scene are different deliverables. Do not transfer an FBX or BVH claim from QuickMagic's mocap product to this Previs workspace without checking.
Before sharing, open the generated output and inspect the camera, duration, timing and final frame. Note any placeholders: rough joins, approximate contacts, missing props or unfinished camera movement. Those notes help reviewers judge the intended scene rather than mistake the blockout for final animation.
Practice: build a short two-character beat
This is an editorial exercise, not the creator's exact sequence. Use it to test whether you understand the workflow.
| Beat | Performer A | Performer B | Review question |
|---|---|---|---|
| Establish | Begins a readable action | Remains visually quiet | Is the main performer obvious? |
| React | Reaches a clear accent | Starts a reaction | Does the response follow the event? |
| Resolve | Returns to a usable ending pose | Completes the response | Does the shot have a clear ending? |
Create two versions with different reaction timing. Compare them from the same camera. Change one variable at a time so that you can tell why one version communicates better.
If you later need a more specific performance, QuickMagic's text-to-motion guide describes generating motion ideas, while its multi-person mocap guide covers captured performer tracks. These are related motion workflows; a direct import or transfer into the Previs workspace is not demonstrated in this recording.
Common 3D previs problems
| Problem | What to check |
|---|---|
| The wrong performer changes | Selected character, right-hand properties and active timeline track. |
| The character does not move | Whether an action was applied, the playhead is inside its range and playback is running. |
| The action ends too early | Clip boundaries and the scene's end range. |
| The join looks abrupt | Facing direction, position and poses on both sides of the boundary. |
| The character leaves the shot | Action travel and the active camera preview, not just the workspace view. |
| The scene feels visually busy | Staggered reactions, character spacing and a clear focus for each beat. |
Build clarity before polish
One readable action, one deliberate reaction and one useful camera view are enough for a first previs pass. Refine the decisions before adding production detail.
Explore QuickMagicFrequently asked questions
What is 3D previs?
3D previs, short for 3D previsualization, is a rough animated version of a scene used to explore staging, movement, timing and camera framing before final production. Its purpose is to make decisions, not to deliver finished character animation or final rendering.
What does the supplied QuickMagic 3D Previs video show?
It shows an existing 3D Previs workspace, adding simple characters, browsing an action library, arranging action clips on a timeline, changing poses and working with a second character. The camera preview is visible. The video does not establish a completed export workflow or every current product capability.
What is the difference between Director View and Camera View?
Use the workspace view to arrange the scene, and inspect the active camera's framing when deciding what the audience will see. The recording shows Director View, a Camera View control and a separate Camera Preview panel. Do not assume orbiting the workspace automatically changes the shot camera.
How do I add motion to a character in 3D Previs?
Select the intended character and open Action to browse the library shown in the recording. Apply a suitable action and check that a clip appears on the correct character track. Preview it before adding another action; the exact interaction may vary with the interface version.
Can I use more than one character?
The supplied recording shows two individually labeled characters with their own actions and timeline work. It does not establish the maximum character count, crowd capacity or plan entitlement.
Can I export a previs scene as FBX, BVH or MP4?
The recording shows an Export control but does not show its settings or a completed export. Check the actual Previs export panel in your account. Do not assume that QuickMagic's motion-capture export formats also describe complete Previs scene, camera or video export.
Is 3D Previs the same as Motion Editor?
No. In these supplied recordings, 3D Previs focuses on scene blocking, action arrangement and framing, while Motion Editor focuses on editing an individual motion through a conversational workflow. A direct transfer between the two is not demonstrated here.
How do I know a previs scene is ready to share?
The main action should read from the intended camera, characters should be distinguishable, the timing should communicate the scene beat, and known placeholder problems should be noted. Save your work and verify the actual output before sharing it.


