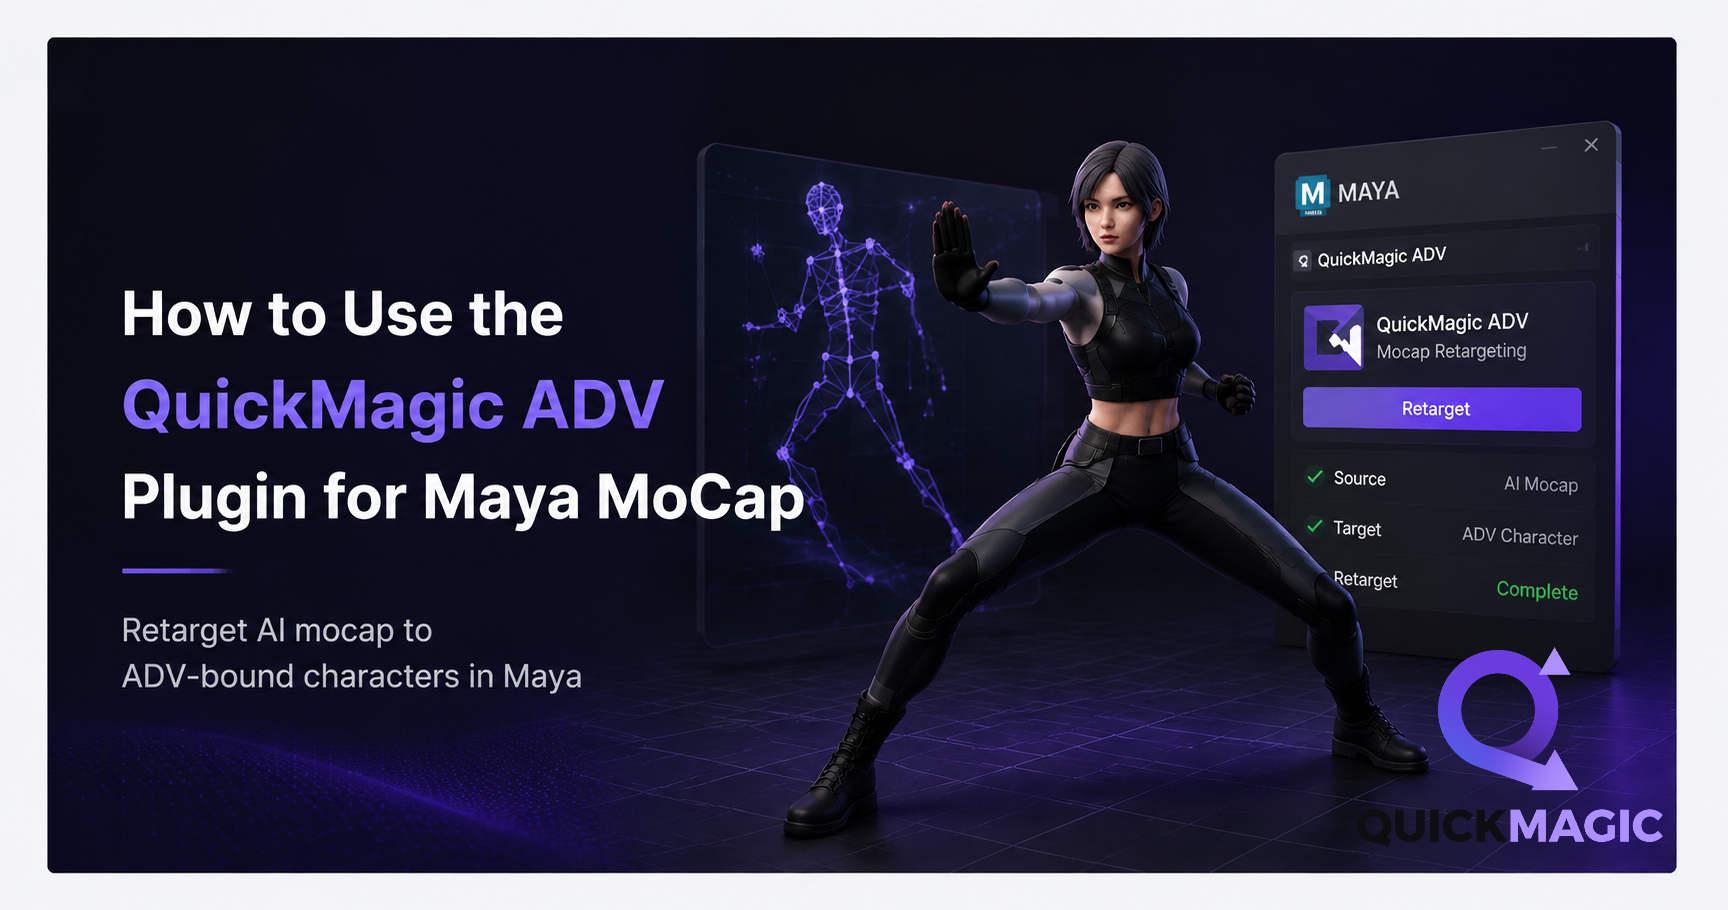
How to Use the QuickMagic ADV Plugin for Maya MoCap
In this walkthrough, we demonstrate the complete QuickMagic ADV Plugin workflow — from installation to final FBX export in Autodesk Maya. Use the timestamps below to jump to any step.
What Is the QuickMagic ADV Plugin for Maya MoCap?
The QuickMagic ADV plugin bridges AI-generated motion capture data from the QuickMagic platform with Autodesk Maya's Advanced Skeleton (ADV) rigging system. It enables animators to retarget AI mocap animations onto ADV-bound characters without manual bone mapping, reducing a traditionally hours-long process to minutes.
QuickMagic is an AI-powered motion capture tool that converts standard video footage into 3D skeletal animation data. Unlike traditional mocap systems that require specialized suits, cameras, and studios, QuickMagic works with any video from a smartphone or webcam. The platform supports full-body, upper-body, hand, and facial motion capture, exporting in FBX, BVH, BIP, VMD, Mixamo, and Unreal Engine formats.
The ADV Plugin (Advanced Skeleton) is one of the most widely used auto-rigging systems in Maya, providing automated skeleton generation, skin binding, and a powerful MoCap Matcher module for retargeting animation data. When combined with QuickMagic's AI mocap output, the ADV plugin creates a streamlined pipeline from video to finished character animation.
Prerequisites and Environment Setup
Before starting, ensure you have the following:
Software Requirements
1.Autodesk Maya 2018 or later (Maya 2022+ recommended)
2.Advanced Skeleton (ADV) plugin version 5.812 or higher
3.QuickMagic account (free tier includes 50 coins/month)
Installing the ADV Plugin
1.Download the ADV plugin from the official QuickMagic Google Drive link: Plugin Download
2.In Maya, go to Windows > Settings/Preferences > Plug-in Manager
3.Browse to the downloaded .mll (Windows) or .bundle (macOS/Linux) file and load it
4.Verify installation by checking for the "AdvancedSkeleton" menu in Maya's top menu bar
Step-by-Step Guide: QuickMagic to Maya MoCap Workflow
Step 1: Capture and Export Motion Data from QuickMagic
1.Log in to your QuickMagic account at quickmagic.ai
2.Upload a video of the motion you want to capture (ensure full body is visible, good lighting, minimal occlusion)
3.Use the in-browser editor to trim the video to the exact motion segment you need (each second costs 1 coin)
4.Select "FBX" as your export format — this is the recommended format for Maya compatibility
5.Download the processed animation file
Pro Tip: QuickMagic supports multiple skeletal standards including QuickMagic Default, Mixamo, Unreal Engine, and BIP. For ADV plugin workflows, the QuickMagic Default or Mixamo format works best.
Step 2: Prepare Your ADV-Bound Character in Maya
1.Open your character scene file in Maya with the ADV rig already built
2.Ensure the character is in T-pose (use the ADV "Fit Mode" to verify)
3.Check that all joint rotations are zeroed (Skeleton > Assume Preferred Angle, then freeze transformations)
4.Verify joint scale values are all 1.0 (scaled joints cause retargeting errors)
5.Confirm the ADV controllers are properly built and functional
Critical Check: Your character must have a root joint at the scene origin (0, 0, 0) for proper root motion transfer during retargeting.
Step 3: Import the MoCap FBX File into Maya
1.Go to File > Import and select your QuickMagic FBX file
2.In the FBX Import options, set:
- File type: FBX
- Up Axis: Y
- Units: centimeters (match your scene units)
3.Click Import — the source skeleton with animation will appear in your viewport
4.Rename the imported skeleton root to "SourceSkeleton" for clarity
5.Set the imported skeleton's first frame to T-pose by zeroing rotations at frame -1 and keying
Step 4: Use the ADV MoCap Matcher for Retargeting
1.Open the ADV plugin panel and navigate to the MoCap Matcher tab
2.Select the root joint of your imported SourceSkeleton
3.Click "Detect from Selected" — the ADV plugin will auto-detect bone mappings
4.Review the mapping list — any unmapped joints will be highlighted in red
5.For unmapped joints, manually select the corresponding joint on your ADV rig and click "Set"
6.Key mapping checkpoints:
- Hips/Root: Must be mapped first
- Spine joints: Map from bottom to top, no skipping
- Neck joints: Same bottom-to-top order as spine
- Limbs: Check Left/Right prefix alignment
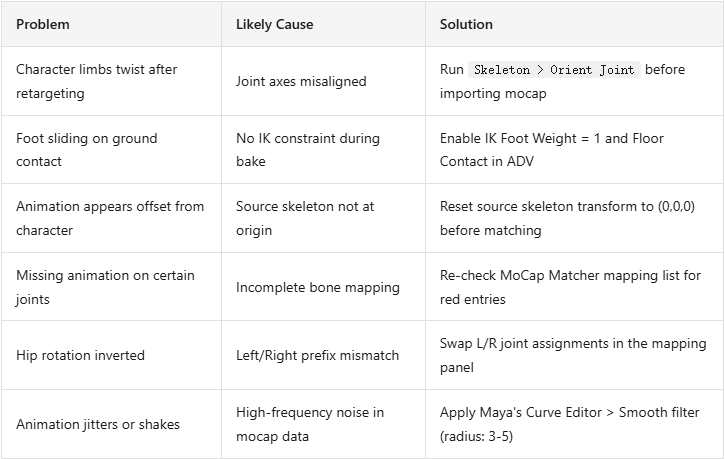
Common Mapping Error Fix: If limbs appear twisted after retargeting, check that joint local axes are consistently oriented. Use Maya's Skeleton > Orient Joint (with "Orient Children" enabled) to normalize axes before retargeting.
Step 5: Bake and Clean Up the Animation
1.In the MoCap Matcher panel, set the bake parameters:
- Sample Rate: 1 (preserves original animation fidelity)
- World Space: On (prevents local coordinate offset)
- Maintain Offset: Off (forces skeletal alignment)
- Bake Range: Set to your animation's start and end frames
2.Click "Bake" — the animation data transfers from the source skeleton to your ADV controllers
3.Delete the SourceSkeleton from the scene
4.Review the animation for common issues:
- Foot sliding: Use IK foot controllers with Floor Contact enabled
- Hip popping: Check for scale keyframes on the source data
- Limb jitter: Apply Maya's Curve Editor smoothing filter
Step 6: Export the Final Animation
1.Select your ADV rig's root controller
2.Go to File > Export Selection (or Export All)
3.Choose FBX format with these settings:
- Animation: Checked
- Bake Animation: On
- Frame Range: Your animation start/end
- Up Axis: Y
- Units: Centimeters
4.Save and test the exported file in your target application (Unreal Engine, Unity, Blender, etc.)
Common Issues and Troubleshooting
Best Practices for AI Mocap in Maya
Video Recording Tips
- Shoot in well-lit environments with even lighting (overcast outdoor or diffused indoor light)
- Use a static camera position; avoid tracking the subject
- Wear form-fitting clothing in colors contrasting with the background
- Exaggerate movements by ~20% — camera perspective and AI processing reduce visible motion amplitude
- Keep the full body in frame throughout the motion
Data Processing Tips
- Trim videos precisely in QuickMagic to conserve coins (1 coin = 1 second)
- Use QuickMagic's anti-penetration correction for complex interactions
- Export at 30fps for standard workflows, 60fps for fast-motion content
- Process multiple takes and compare results before committing to retargeting
Maya Workflow Tips
- Always work on a duplicate of your rig scene, never the original
- Create a reference edit of the mocap data for non-destructive retargeting
- Use Maya's Time Editor for layering multiple mocap clips
- Save animation presets for repeated retargeting workflows
QuickMagic ADV Plugin vs. Alternative Workflows
FAQ - Frequently Asked Questions
What is the QuickMagic ADV plugin for Maya?
The QuickMagic ADV plugin is a tool that bridges QuickMagic AI motion capture data with Autodesk Maya's Advanced Skeleton (ADV) rigging system. It enables users to retarget AI-generated mocap animations onto ADV-bound characters without manual bone mapping.
Is the QuickMagic ADV plugin free?
Yes, the QuickMagic ADV plugin is free to download. QuickMagic also offers a free tier with 50 coins per month (1 coin = 1 second of motion capture), sufficient for testing the workflow.
Which Maya versions support the ADV plugin?
The ADV plugin (Advanced Skeleton) supports Maya 2018 and later versions. For best compatibility, use Maya 2019+ with Advanced Skeleton version 5.812 or higher.
Can I use QuickMagic mocap data without the ADV plugin?
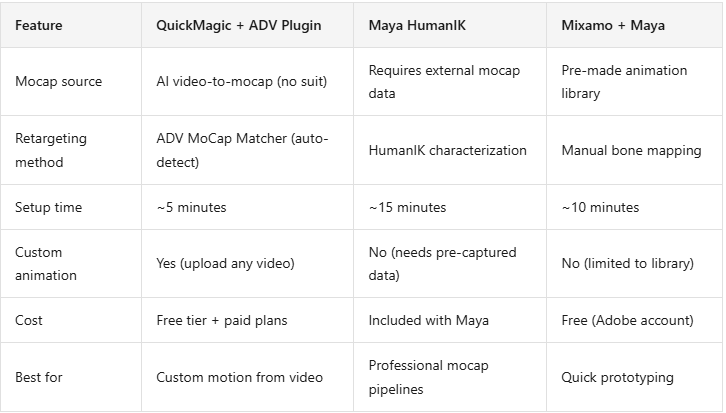
Yes, QuickMagic exports animations in FBX, BVH, BIP, VMD, Mixamo, and UE formats. You can use Maya's built-in HumanIK system for retargeting without the ADV plugin, though the ADV MoCap Matcher provides a more streamlined workflow for ADV-bound characters.
How accurate is QuickMagic AI motion capture compared to traditional mocap?
QuickMagic produces grounded, stable motion data with accurate foot planting detection. While it may not match the precision of optical mocap systems for complex interactions, it provides excellent results for character animation, game development, and content creation at a fraction of the cost.
What file format should I export from QuickMagic for Maya?
Export your animation as FBX from QuickMagic for use in Maya. The FBX format preserves skeletal hierarchy and animation data, making it compatible with both the ADV MoCap Matcher and Maya's native import tools.
How do I fix foot sliding in ADV mocap retargeting?
To fix foot sliding, enable IK Foot Weight to 1 in the ADV IK/FK Blend panel, activate Floor Contact for foot controllers, and set keyframes at contact frames using breakdown keys. This locks the feet to the ground during planting phases.
Conclusion and Next Steps
The QuickMagic ADV plugin for Maya MoCap provides an efficient, cost-effective pipeline for bringing AI-generated motion capture data into your 3D character animation workflow. By combining QuickMagic's video-to-mocap AI with the ADV plugin's automated retargeting, you can go from raw video to finished character animation in under 30 minutes.

This tutorial was tested with Maya 2024 and Advanced Skeleton 5.812. For questions or feature requests, contact the QuickMagic team.