


Source Video · QuickMagic · Retargeting · Cleanup

How to Improve AI Motion Capture Quality: 15 Proven QuickMagic Tips

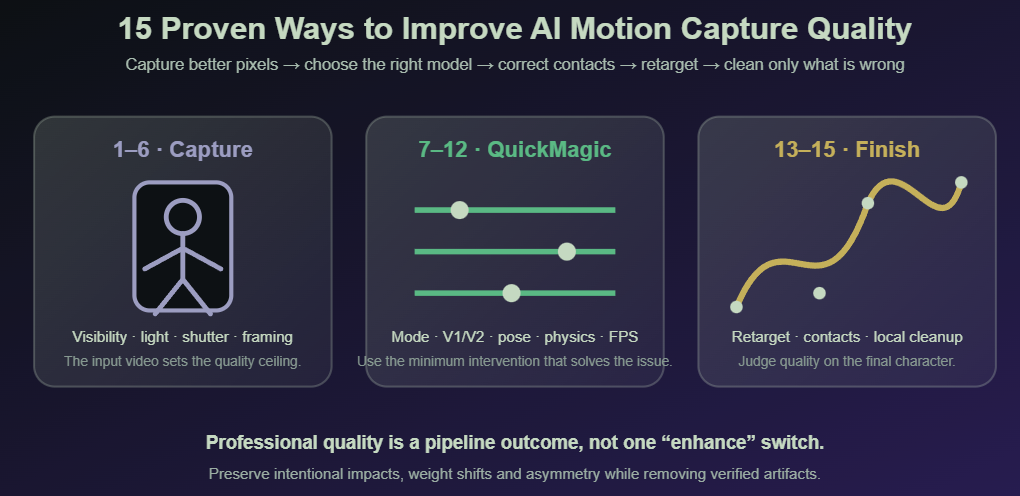
Improve markerless motion capture from the source video through final delivery: record trackable footage, choose the correct capture mode and V1/V2 base model, tune Physics Optimization 2.0, correct visible tracking errors, retarget accurately, lock contacts and clean only the curves that are actually noisy.

Published March 2, 2026 · Updated July 15, 2026 · QuickMagic Editorial Team

Fifteen QuickMagic AI motion capture quality tips grouped into capture, platform and finishing stages
Direct answer: AI mocap quality improves most when the performer is large, sharp and fully visible; the capture scope and base model match the footage; QuickMagic correction is applied conservatively; and the final animation is judged after retargeting. Start with a short test, correct visible source errors before export, match the target pose and root, lock feet only during true contacts, and smooth only verified jitter.

Current QuickMagic facts

Free plan30-second video, 100 MB and FBX
Starter/Professional60-second maximum and 200 MB
2D RefinementListed for Starter and Professional
Physics iterations1×, 2×, 3×, 4×, 5× and 10×
V1.0General-purpose and dance movement
V2.0 BetaComplex dynamics and partial occlusion
Accuracy corrections: this edition removes unsupported universal accuracy percentages and broad cost claims. It also corrects the source article's statement that “Base Model V2.0” is designed for upper-body-only videos. Upper Body is a capture-scope option; V2.0 Beta is a dynamic-motion base model. The source page's current cover image also depicts a Blender tutorial, so a new topic-specific hero has been used above.

Capture-quality and cleanup videos

Stable Full-Body Animation with QuickMagic AI Markerless MoCap

Shows source-footage and generation choices for producing a stable full-body result.

Open video on YouTube

Video AI MoCap to Game-Ready Animation: QuickMagic Cleanup Workflow

Demonstrates downstream cleanup and preparation of QuickMagic motion for a game-ready asset.

Open video on YouTube

Both players use static YouTube iframes and no runtime JavaScript. If a browser, network, region or local file viewer blocks embedded playback, use the red direct links. All article illustrations are embedded in this HTML file.

Tips 1–6: Capture better source evidence

Recommended full-body AI motion capture recording setup with stable camera, wide framing and bright lighting
The source video sets the quality ceiling. No model can exactly reconstruct motion that is blurred, cropped or hidden for a long interval.

1Use a level, stable camera at a practical height

For full-body capture, begin with a locked-off camera roughly around the performer's mid-torso or chest height, then adjust to keep perspective distortion low. A slight three-quarter view can separate overlapping limbs, while extreme high, low or tilted angles make body proportions harder to infer.

2Keep every required body part inside a safety margin

Full-body motion needs the head, hands and feet. Upper-body motion still needs the hands if gestures matter. Leave extra space around jumps, kicks, rolls and traveling actions rather than framing only the opening pose.

3Prioritize subject pixels, not only nominal resolution

Comparison between a distant 4K performer and a correctly framed 1080p performer

1080p is a strong practical starting point, but a distant performer in a 4K frame can contain less usable joint detail than a sharp, correctly framed 1080p subject. Hands and faces need closer framing than broad body motion.

4Use enough light and shutter speed to control motion blur

Fast punches, spins, jumps and feet can smear even in high-resolution video. Add light, use a faster shutter when possible and avoid heavy low-light denoising. Higher output FPS cannot recover detail that was blurred in the source.

5Create clear silhouette and clothing contrast

Use clothing that reveals limb direction and differs from the background. Avoid long coats, loose skirts, reflective fabric and hair that continuously hides the neck, shoulders or face. A simple background helps, but subject separation matters more than a specific wall color.

6Control occlusion, overlap and source timing

Avoid prolonged crossed limbs, furniture blocking the knees or feet and multiple performers overlapping. Upload the original camera file. When a phone's variable-frame-rate recording causes duration or audio problems, create a constant-frame-rate mezzanine before processing.

Tips 7–12: Use the correct QuickMagic workflow

7Choose capture scope from what the video actually shows

Difference between QuickMagic capture scope and Animation Base Model selection

Use Full Body when legs, feet and global travel matter; Upper Body for torso, head and arm gestures; and hand or face options only when those details are sufficiently visible. Do not ask a full-body workflow to invent a lower body from a tight close-up.

8Use V1.0 for standard action and V2.0 Beta for complex dynamics

V1.0 is the stable general-purpose choice for walking, ordinary acting and dance. V2.0 Beta is intended for climbing, stairs, slopes, crawling, rolling, jumps, falls, rapid balance changes and brief partial occlusion. V2 prediction is a continuity aid, not proof of the performer's exact invisible pose.

9Match Original, T-Pose or A-Pose to the target retargeter

A reference-pose mismatch can look like poor capture: shoulders rise, wrists twist and the pelvis tilts. Correct the source/target neutral pose before filtering animation curves.

10Use the minimum necessary Physics Optimization 2.0

Physics Optimization 2.0 iteration scale from motion detail to smoother softer animation

QuickMagic's changelog describes low multipliers as preserving more motion accuracy and amplitude, while high multipliers increase smoothness and reduce amplitude. Start at 1×–2× for impacts and expressive motion, then increase only when a visible artifact justifies it.

11Use 2D Refinement for wrong observations, not final rig problems

Paid plans currently list 2D Refinement. Correct visibly misplaced body keypoints, left/right identity errors and contact labels in the source video, save the changes and regenerate. Do not use source correction to compensate for a target character's bad skin weights or mismatched proportions.

12Set FPS, root behavior and target preset deliberately

Match the animation rate to the delivery pipeline, choose traveling or in-place motion before foot cleanup, and use the most specific target preset available. Two FBX files can use different bone names, hierarchies and reference poses.

Tips 13–15: Finish the animation on the real target

AI motion capture quality control order from source video to QuickMagic, retargeting, contacts and curve cleanup
Cleanup order matters. Curve smoothing is near the end of the pipeline, not the beginning.

13Retarget before judging foot sliding and body proportions

Align the source and target poses, map the root/pelvis and limb chains, and verify target scale and stride. Different leg lengths can introduce foot sliding even when the QuickMagic source is clean.

14Establish contacts before smoothing or key reduction

Correct root speed first, then lock feet or hands only during real contact intervals. Blend into and out of IK locks. Unreal Engine's Speed Planting workflow similarly uses animation curves to determine when IK goals should be pinned during retargeting.

15Apply local cleanup and physics assistance—not global flattening

Blender's Graph Editor provides detailed F-Curve editing and smoothing; select only noisy channels and ranges. Cascadeur AutoPhysics can suggest a more physically accurate version, but it remains an assistive tool: define contacts, review center of mass and preserve the performance intent before applying the result.

Problem-to-fix matrix

ProblemCheck firstQuickMagic actionFinal-stage action
Foot slidingSource contact and root travel2D Refinement and conservative physicsMatch target stride, then use timed foot IK
JitterBlur, compression and occlusionLower-noise source and minimum useful iterationLocal F-Curve smoothing/key reduction
Forward leanCamera angle and source skeletonReshoot or correct keypointsCheck retarget pose and pelvis mapping
Position driftLong take and root consistencyProcess representative shorter segments when neededAlign/blend roots in the DCC
Twisted wrists/armsLeft-right identity and source rotationModel comparison or source correctionFix pose, chains, axes and Euler discontinuities
ClippingSource joint pose versus target meshCorrect impossible source poseSkin weights, joint limits and corrective shapes
Weak hands/facePixel size and visibilityUse appropriate close framing and capture modeMap target hand/facial controls explicitly

Software-specific finishing

SoftwareRecommended quality toolsPrimary caution
BlenderGraph Editor, IK constraints, NLA layers and corrective Shape KeysDo not decimate all channels before contact validation
MayaHumanIK, Graph Editor, animation layers, IK controls and pose-space correctivesMatch source and target pose before filtering
Unreal EngineIK Retargeter, Pelvis Motion, Speed Planting, FBIK and Control RigRuntime render FPS is separate from animation sample rate
UnityHumanoid Avatar, Animation Rigging constraints and Animation Clip reviewCheck root transform and loop settings
iCloneMotion Correction, Edit Motion Layer, Reach/Release contacts and Curve EditorFlatten layers only after approval
CascadeurAutoPhysics, Fulcrum Points, Physics Corrector and Secondary MotionPhysics suggestions still require animator judgment

Professional quality checklist

  • The required body parts stay inside the frame with a safety margin.
  • Fast limbs are sharp enough to track.
  • The subject is visually separated from the background.
  • Capture scope matches the visible body region.
  • V1.0 or V2.0 is chosen from movement complexity.
  • Reference pose, FPS, root behavior and target preset are recorded.
  • Physics Optimization uses the lowest multiplier that solves the issue.
  • Visible source errors are corrected before export.
  • The source is retargeted before target-specific foot locking.
  • Smoothing and key reduction are limited to verified noisy curves.
  • The final file is reimported and checked for timing, contacts and deformation.

Original source-page image

The current source-page cover appears to describe a Blender tutorial rather than this capture-quality article. It is embedded below for archival reference but is not used as the SEO hero image.

Current source-page cover image labeled How to Use AI Mocap in Blender

Frequently asked questions

What matters most for AI mocap quality?

The camera must provide usable visual evidence: body parts should be large enough, sharp, well lit and visible. Resolution alone cannot solve cropping or motion blur.

Should I always use V2.0?

No. V1.0 is appropriate for general movement and dance. Use V2.0 Beta for complex dynamics, terrain, airborne phases, falls, rolling and brief occlusion.

Is V2.0 the upper-body model?

No. Upper Body is a capture scope. V2.0 is a dynamic-motion base model. These options solve different problems.

Which Physics Optimization iteration is best?

Start with 1× or 2× and increase gradually. High values can smooth visible noise but can also reduce motion amplitude and impact.

How do I fix foot sliding?

Correct source contacts, retarget to the final character, match root speed and stride, then lock the foot only during planted frames.

Does 4K always produce better mocap than 1080p?

No. Correct framing, sharpness and contrast can be more important. A distant performer can occupy too few pixels even in a 4K image.

Should I smooth every bone?

No. Smooth only the affected bones and intervals after retargeting. Preserve impacts, natural weight shifts and asymmetric gestures.

Can Cascadeur automatically finish the animation?

AutoPhysics can suggest a physically accurate result, but the animator must review contacts, center of mass, interaction and performance intent.

Related QuickMagic guides

Test the hardest five to ten seconds first

Validate framing, capture scope, V1/V2, Physics Optimization, target preset and final retargeting on a short representative section before processing the full performance.

Open QuickMagic AI Motion Capture →

Official and primary references


