


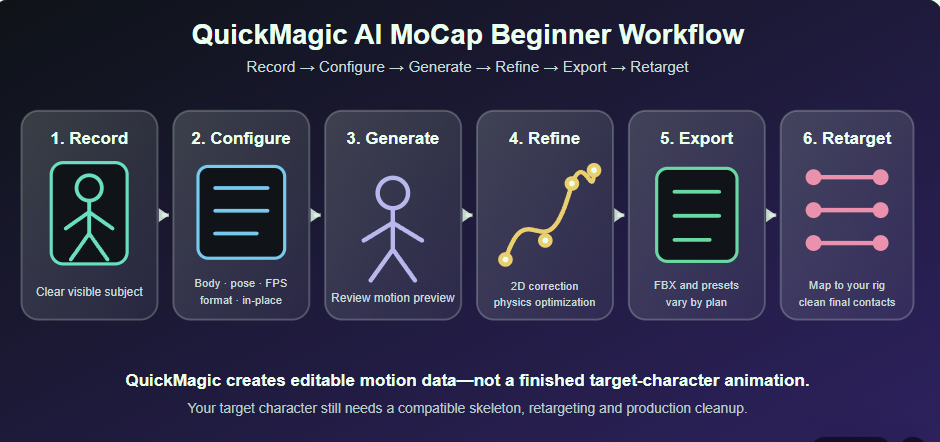
Record · Configure · Generate · Refine · Export · Retarget
QuickMagic AI MoCap Beginner Guide: Create Your First 3D Motion
Learn what QuickMagic generates, how to record a trackable video, choose body, hand and face options, select Original/T/A-Pose, frame rate, physical optimization, in-place motion and a target format, refine visible errors, and retarget the exported animation to a rigged character.
Current Free-plan facts
QuickMagic beginner video tutorials
These creator tutorials provide a complete visual walkthrough of generating and using QuickMagic motion. Use them as demonstrations, then confirm settings in the current QuickMagic interface.
Quick Magic AI Video Motion Capture Tutorial
A general introduction to the video-to-motion process and beginner workflow.
Open video on YouTubeQuickMagic AI Mocap Tutorial — Blender, Unity, Mixamo
Shows how target presets and retargeting affect Blender, Unity and Mixamo workflows.
Open video on YouTubeWhat does QuickMagic create?
QuickMagic analyzes standard video and estimates editable 3D motion. Depending on the workflow, that can include full-body or upper-body skeletal motion, hand movement, facial blend-shape data, multiple subjects, static or moving-camera footage and text-generated motion.
1Record a trackable source video
- Keep the required body parts inside the frame.
- For full-body capture, keep the feet and visible floor in frame.
- Use bright, even lighting to reduce motion blur.
- Choose clothing that separates the limbs from the background.
- Use a stable camera unless the selected workflow supports camera movement.
- Avoid long periods of crossed limbs, hidden hands or people overlapping.
- Upload the original camera file rather than a compressed social-media copy.
| Motion | Recommended framing | Main risk |
|---|---|---|
| Walk, turn, gestures | Stable full-body shot at 30 FPS | Cropped feet and weak floor contact |
| Dance or fast action | Wide framing, bright light, 60 FPS when supported | Blur and self-occlusion |
| Upper-body acting | Waist-up, hands and face clearly visible | Hands crossing the torso |
| Face capture | Closer view, even facial lighting | Wide full-body shots contain little face detail |
| Multiple people | Each subject continuously visible | Identity swaps during overlap |
2Upload and trim the source
- Sign in to QuickMagic and open the Video-to-Motion workflow.
- Upload the original video.
- Confirm the correct subject and frame range.
- Trim unused setup or exit frames when the current interface provides trimming.
- Keep the first test short enough to review quickly.
- Use a descriptive project title without sensitive information.
3Choose capture and output settings
Capture scope
- Full Body: use when legs, feet and global travel matter.
- Upper Body: use for dialogue gestures and framed performances.
- Hand: requires visible, sufficiently large hands and low blur.
- Face: requires clear facial detail and a compatible target facial rig.
Frame rate
The current Free plan uses 30 FPS. Current paid-plan options include 24, 30, 60 and 120 FPS with shorter maximum durations at higher rates. Match the destination timeline instead of automatically choosing the highest value.
Physical Optimization
Physical Optimization is intended to improve body mechanics and common contact artifacts. It is still necessary to inspect the result on the final target character, because different proportions can create new foot or hand errors after retargeting.
In-place Motion
- OFF: preserve walking, running or performance travel.
- ON: keep the character near the origin for locomotion loops and navigation systems.
Original Pose vs. T-Pose vs. A-Pose
These options control the starting/reference pose included in the generated output. They do not mean every target character will automatically retarget correctly.
| Option | Choose it when |
|---|---|
| Original Pose | You want the source motion to begin from its observed pose or the target pipeline does not require a standardized neutral pose. |
| T-Pose | The target retargeter or skeleton profile expects horizontal arms. |
| A-Pose | The target character—such as many production/game characters—uses arms angled down. |
4Generate and review the motion
Review the generated result before downloading:
- The intended performer remains selected.
- Left and right limbs do not swap.
- The character faces the correct direction.
- Root travel matches the source or the selected In-place behavior.
- Feet and hands maintain plausible contact.
- There are no major jumps, collapses or missing body regions.
- The animation duration and frame rate are correct.
The original beginner page states that the mocap preview video cannot be downloaded and only motion data files are available. Treat the current product interface as the final authority if preview/download behavior changes.
5Sync 2D Refinement to the 3D motion
QuickMagic's current pricing table lists 2D Refinement for Starter and Professional plans. Use it when a visible joint or limb is tracked incorrectly in specific frames.
- Open the 2D Refinement editor.
- Locate the incorrect frame range.
- Adjust the affected 2D keypoints rather than moving unrelated body parts.
- Use interpolation where appropriate.
- Save the changes.
- Create or regenerate the motion from the corrected data.
- Compare the new 3D result with the previous result.
Choose the correct format and target preset
The current QuickMagic public pages list FBX and multiple workflow-specific outputs, including Unreal, Mixamo, BIP, VMD, OnlyFace, Unity Anim, C4D, CC&iClone, Roblox and additional formats such as BVH on supported workflows.
| Destination | Recommended starting output | What to verify |
|---|---|---|
| Blender | FBX/Mixamo or BVH | Scale, armature, reference pose and retarget add-on |
| Maya | FBX | HumanIK/target mapping, axis, units and frame rate |
| Unreal Engine | Matching UE preset | UE skeleton version, IK Rig chains and root motion |
| Unity | Unity Anim or compatible FBX | Humanoid Avatar, Animator and Root Transform settings |
| 3ds Max Biped | BIP | Biped structure and figure proportions |
| MikuMikuDance | VMD-TDA | Bone names, scale, IK and morph compatibility |
| Character Creator/iClone | CC&iClone preset | Characterization and motion root |
| Cinema 4D | C4D preset or FBX | Character Definition, axis and baked skeleton |
| Roblox | Roblox preset | Target avatar hierarchy and FBX animation import |
The current Free plan lists FBX. Starter and Professional list FBX, Unreal, Mixamo, BIP, VMD, Only Face, Unity Anim, C4D, CC&iClone and Roblox. Export availability can change, so check the current plan and export screen.
OnlyFace and ARKit-compatible facial motion
QuickMagic's beginner documentation describes OnlyFace as an ARKit-compatible 52-blendshape workflow. The output represents facial deformation channels rather than a universal character face.
Your target needs one of these
- Matching ARKit-compatible blend shapes
- A mapping from ARKit names to the target's custom blend shapes
- A joint/control rig that can be driven from the expression coefficients
6Retarget the exported motion to your character
- Import the QuickMagic source skeleton and animation.
- Import or load the rigged target character.
- Map hips, spine, neck, head, arms, hands, legs and feet.
- Match the source and target T-pose/A-pose.
- Preview before baking.
- Correct root travel and target-specific contacts.
- Bake the approved motion to the target rig.
- Export or integrate the target animation.
Five beginner rules that improve results
- Keep the subject visible. Visibility usually matters more than camera brand.
- Use bright light. A faster shutter reduces motion blur.
- Test the real target early. A clean source can still fail on a mismatched rig.
- Correct major source errors before export. Do not hide an identity swap with broad smoothing.
- Preserve the source file. Keep original video, raw motion and final target animation separately.
Common beginner problems
| Problem | Likely cause | Recommended fix |
|---|---|---|
| Feet disappear or slide | Feet cropped, poor floor visibility or root mismatch | Reshoot wider, refine the source and correct root/contact after retargeting. |
| Arms twist on the target | T-pose/A-pose or skeleton preset mismatch | Choose the correct reference pose and target preset before smoothing. |
| Character travels when it should stay still | In-place Motion is off | Regenerate with In-place enabled or remove root travel downstream. |
| Character does not move after import | Wrong skeleton, animation disabled or incompatible format | Verify the exported clip and characterize/retarget the source skeleton. |
| Face remains neutral | Body-only output or missing facial mapping | Use OnlyFace/face processing and map the channels to the target rig. |
| 2D corrections do not appear | Motion was not recreated after saving | Save the corrected keypoints and regenerate/create a new motion. |
| Desired format is missing | Current plan, workflow or product version does not include it | Check the active export menu and current pricing page. |
| Old guide says results cannot change format | The product workflow may have changed since publication | Use the current interface as the source of truth; regenerate when required. |
Frequently asked questions
What does QuickMagic AI motion capture do?
It estimates body, hand and facial movement from video and converts the result into editable 3D animation data. The output still needs a compatible rig and retargeting.
Is QuickMagic free for beginners?
The current Free plan provides 50 V Coins, low-priority processing, two queued mocap videos, a 30-second maximum clip, a 100 MB upload limit, FBX output and 15-day storage.
Which export should a beginner choose?
Start with FBX and choose the target-specific skeleton preset required by the destination. A generic FBX may require more manual characterization.
What is the difference between Original, T and A Pose?
Original preserves the chosen source pose, T-Pose uses horizontal arms and A-Pose angles the arms down. Match the pose expected by the target retargeter.
What does In-place Motion do?
It keeps the animation near the origin by removing or reducing global travel. Leave it off for traveling cinematics or root-motion gameplay.
How does 2D Refinement affect the 3D motion?
Adjust visible 2D body keypoints, save the corrections and regenerate the motion. The current pricing page lists 2D Refinement for Starter and Professional plans.
What is OnlyFace?
QuickMagic describes OnlyFace as an ARKit-compatible 52-blendshape facial workflow. The target needs compatible blend shapes or an explicit facial mapping.
Can I upload my own character to the mocap module?
The original beginner page states that custom-character upload was not supported in that workflow. QuickMagic primarily exports motion for retargeting in external software. Check the current product interface because this feature may evolve.
How long are assets stored?
The current pricing comparison lists 15 days for the Free plan and ongoing storage for Starter and Professional. Consult the current Privacy Policy for retention details.
Related QuickMagic guides
Create a short test before processing a full performance
Record a 5–10 second clip, validate the format and target skeleton on your real character, then reuse the confirmed settings for longer motions.
Official references and video sources
- QuickMagic: Original beginner guide
- QuickMagic: Current product capabilities and FAQ
- QuickMagic: Current pricing, formats, duration and storage
- QuickMagic: Facial capture and OnlyFace workflow
- QuickMagic: Export formats and software compatibility
- Quick Magic AI Video Motion Capture Tutorial
- QuickMagic AI Mocap Tutorial — Blender, Unity, Mixamo




